java.util Part 1:
This chapter begins our examination of java.util. This important package contains a large assortment of classes and interfaces that support a broad range of functionality. For example, java.util has classes that generate pseudorandom numbers, manage date and time, observe events, manipulate sets of bits, tokenize strings, and handle formatted data. The java.util package also contains one of Java’s most powerful subsystems: the Collections Framework. The Collections Framework is a sophisticated hierarchy of interfaces and classes that provide state-of-the-art technology for managing groups of objects. It merits close attention by all programmers. Beginning with JDK 9, java.util is part of the java.base module.
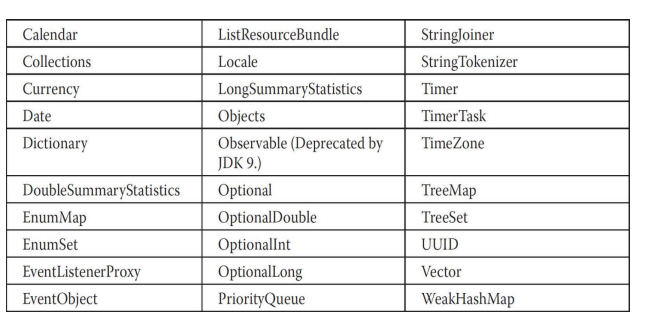
Because java.util contains a wide array of functionality, it is quite large. Here is a list of its top-level classes:
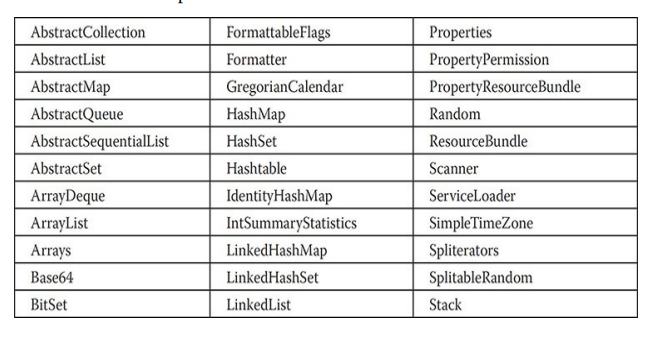
Because of its size, the description of java.util is broken into two chapters. This chapter examines those members of java.util that are part of the Collections Framework. Chapter 20 discusses its other classes and interfaces.
Collections Overview
The Java Collections Framework standardizes the way in which groups of objects are handled by your programs. Collections were not part of the original Java release, but were added by J2SE 1.2. Prior to the Collections Framework,
Java provided ad hoc classes such as Dictionary, Vector, Stack, and Properties to store and manipulate groups of objects. Although these classes were quite useful, they lacked a central, unifying theme. The way that you used Vector was different from the way that you used Properties, for example. Also, this early, ad hoc approach was not designed to be easily extended or adapted. Collections were an answer to these (and other) problems.
The Collections Framework was designed to meet several goals. First, the framework had to be high-performance. The implementations for the fundamental collections (dynamic arrays, linked lists, trees, and hash tables) are highly efficient. You seldom, if ever, need to code one of these “data engines” manually. Second, the framework had to allow different types of collections to work in a similar manner and with a high degree of interoperability. Third, extending and/or adapting a collection had to be easy. Toward this end, the entire Collections Framework is built upon a set of standard interfaces. Several standard implementations (such as LinkedList, HashSet, and TreeSet) of these interfaces are provided that you may use as-is. You may also implement your own collection, if you choose. Various special- purpose implementations are created for your convenience, and some partial implementations are provided that make creating your own collection class easier. Finally, mechanisms were added that allow the integration of standard arrays into the Collections Framework. Algorithms are another important part of the collection mechanism.
Algorithms operate on collections and are defined as static methods within the Collections class. Thus, they are available for all collections. Each collection class need not implement its own versions. The algorithms provide a standard means of manipulating collections.
Another item closely associated with the Collections Framework is the Iterator interface. An iterator offers a general-purpose, standardized way of accessing the elements within a collection, one at a time. Thus, an iterator provides a means of enumerating the contents of a collection. Because each collection provides an iterator, the elements of any collection class can be accessed through the methods defined by Iterator. Thus, with only small changes, the code that cycles through a set can also be used to cycle through a list, for example.
JDK 8 added another type of iterator called a spliterator. In brief, spliterators are iterators that provide support for parallel iteration. The interfaces that support spliterators are Spliterator and several nested interfaces that support primitive types. JDK 8 also added iterator interfaces designed for use with primitive types, such as PrimitiveIterator and PrimitiveIterator.OfDouble.
In addition to collections, the framework defines several map interfaces and classes. Maps store key/value pairs. Although maps are part of the Collections Framework, they are not “collections” in the strict use of the term. You can, however, obtain a collection-view of a map. Such a view contains the elements from the map stored in a collection. Thus, you can process the contents of a map as a collection, if you choose.
The collection mechanism was retrofitted to some of the original classes defined by java.util so that they too could be integrated into the new system. It is important to understand that although the addition of collections altered the architecture of many of the original utility classes, it did not cause the deprecation of any. Collections simply provide a better way of doing several things.
NOTE
If you are familiar with C++, then you will find it helpful to know that the Java collections technology is similar in spirit to the Standard Template Library (STL) defined by C++. What C++ calls a container, Java calls a collection. However, there are significant differences between the Collections Framework and the STL. It is important to not jump to conclusions.
The Collection Interfaces
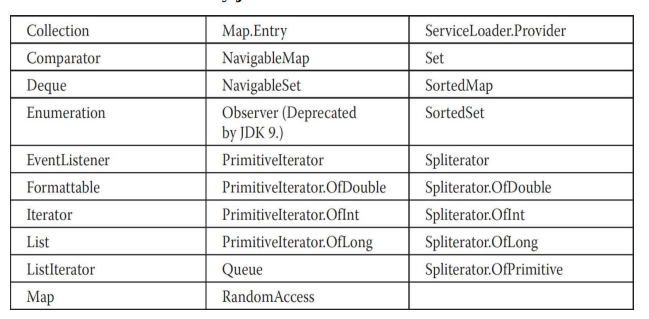
The Collections Framework defines several core interfaces. This section provides an overview of each interface. Beginning with the collection interfaces is necessary because they determine the fundamental nature of the collection classes. Put differently, the concrete classes simply provide different implementations of the standard interfaces. The interfaces that underpin collections are summarized in the following table:

In addition to the collection interfaces, collections also use the Comparator, RandomAccess, Iterator, ListIterator, and Spliterator interfaces, which are described in depth later in this chapter. Briefly, Comparator defines how two objects are compared; Iterator, ListIterator, and Spliterator enumerate the objects within a collection. By implementing RandomAccess, a list indicates that it supports efficient, random access to its elements.
To provide the greatest flexibility in their use, the collection interfaces allow some methods to be optional. The optional methods enable you to modify the contents of a collection. Collections that support these methods are called modifiable. Collections that do not allow their contents to be changed are called unmodifiable. If an attempt is made to use one of these methods on an unmodifiable collection, an UnsupportedOperationException is thrown. All the built-in collections are modifiable.
The following sections examine the collection interfaces.
The Collection interface
The Collection interface is the foundation upon which the Collections Framework is built because it must be implemented by any class that defines a collection. Collection is a generic interface that has this declaration:
interface Collection<E>
Here, E specifies the type of objects that the collection will hold. Collection extends the Iterable interface. This means that all collections can be cycled through by use of the for-each style for loop. (Recall that only classes that implement Iterable can be cycled through by the for.)
Collection declares the core methods that all collections will have. These methods are summarized in Table 19-1. Because all collections implement Collection, familiarity with its methods is necessary for a clear understanding of the framework. Several of these methods can throw an UnsupportedOperationException. As explained, this occurs if a collection cannot be modified. A ClassCastException is generated when one object is incompatible with another, such as when an attempt is made to add an incompatible object to a collection. A NullPointerException is thrown if an attempt is made to store a null object and null elements are not allowed in the collection. An IllegalArgumentException is thrown if an invalid argument is used. An IllegalStateException is thrown if an attempt is made to add an element to a fixed-length collection that is full.
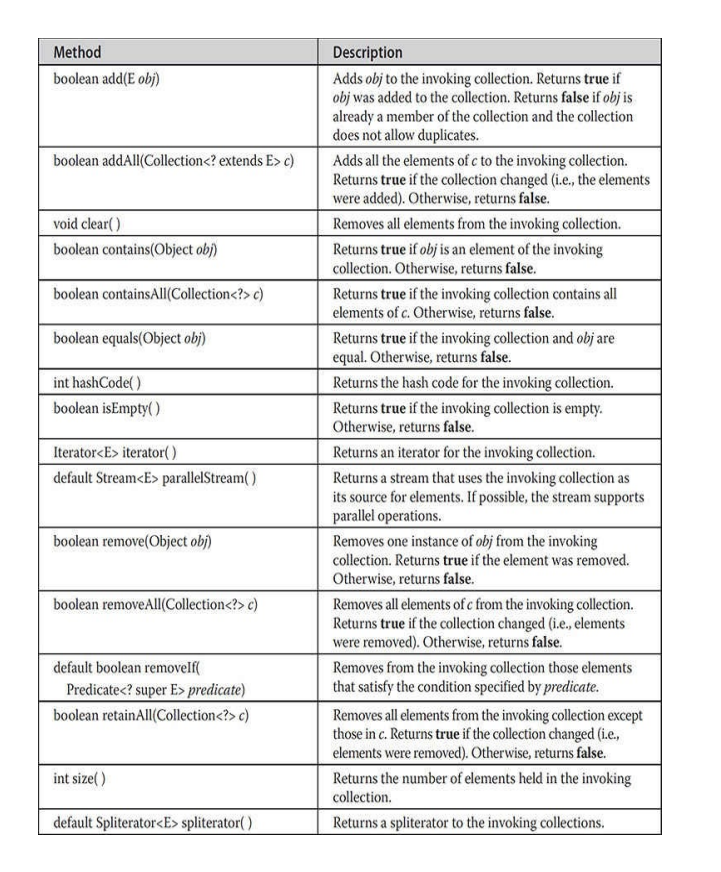
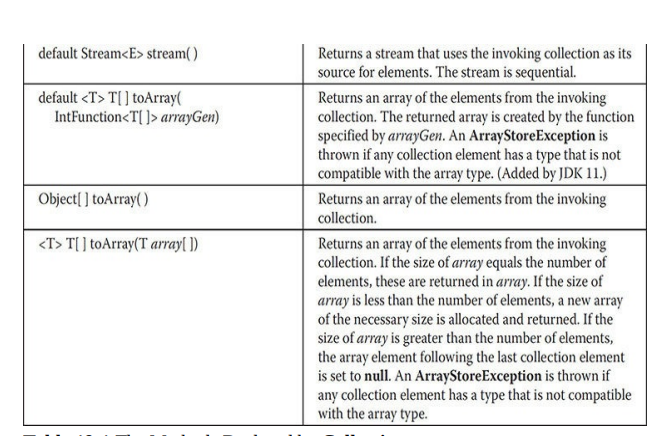
Table 19-1 The Methods Declared by Collection
Objects are added to a collection by calling add(). Notice that add() takes an argument of type E, which means that objects added to a collection must be compatible with the type of data expected by the collection. You can add the entire contents of one collection to another by calling addAll().
You can remove an object by using remove(). To remove a group of objects, call removeAll(). You can remove all elements except those of a specified group by calling retainAll(). To remove an element only if it statisfies some condition, you can use removeIf(). To empty a collection, call clear().
You can determine whether a collection contains a specific object by calling contains(). To determine whether one collection contains all the members of another, call containsAll(). You can determine when a collection is empty by calling isEmpty(). The number of elements currently held in a collection can be determined by calling size().
The toArray() methods return an array that contains the elements stored in the collection. The first returns an array of Object. The second returns an array of elements that have the same type as the array specified as a parameter. Normally, the second form is more convenient because it returns the desired array type. Beginning with JDK 11, a third form has been added that lets you specify a function that obtains the array. These methods are more important than it might at first seem. Often, processing the contents of a collection by using array-like syntax is advantageous. By providing a pathway between collections and arrays, you can have the best of both worlds.
Two collections can be compared for equality by calling equals(). The precise meaning of “equality” may differ from collection to collection. For example, you can implement equals() so that it compares the values of elements stored in the collection. Alternatively, equals() can compare references to those elements.
Another important method is iterator(), which returns an iterator to a collection. The spliterator() method returns a spliterator to the collection. Iterators are frequently used when working with collections. Finally, the stream() and parallelStream() methods return a Stream that uses the collection as a source of elements. (See Chapter 29 for a detailed discussion of the Stream interface.)
The List Interface
The List interface extends Collection and declares the behavior of a collection that stores a sequence of elements. Elements can be inserted or accessed by their position in the list, using a zero-based index. A list may contain duplicate elements. List is a generic interface that has this declaration:
interface List<E>
Here, E specifies the type of objects that the list will hold. In addition to the methods defined by Collection, List defines some of its own, which are summarized in Table 19-2. Note again that several of these methods will throw an UnsupportedOperationException if the list cannot be modified, and a ClassCastException is generated when one object is incompatible with another, such as when an attempt is made to add an incompatible object to a list. Also, several methods will throw an IndexOutOfBoundsException if an invalid index is used. A NullPointerException is thrown if an attempt is made to store a null object and null elements are not allowed in the list. An IllegalArgumentException is thrown if an invalid argument is used.
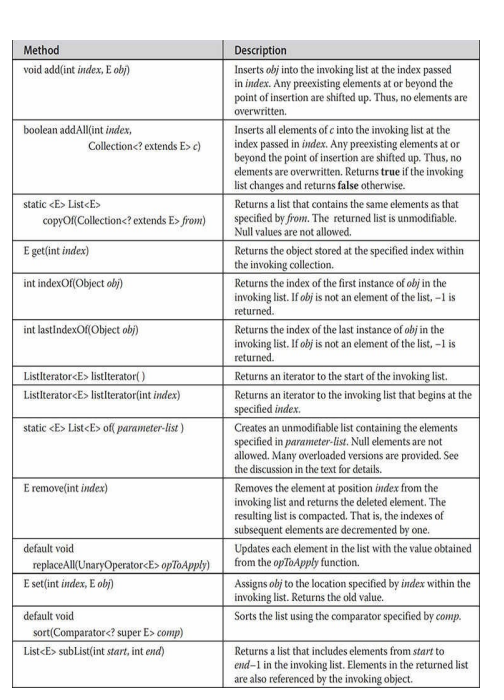
To the versions of add() and addAll() defined by Collection, List adds the methods add(int, E) and addAll(int, Collection). These methods insert elements at the specified index. Also, the semantics of add(E) and addAll(Collection) defined by Collection are changed by List so that they add elements to the end of the list. You can modify each element in the collection by using replaceAll().
To obtain the object stored at a specific location, call get() with the index of the object. To assign a value to an element in the list, call set(), specifying the index of the object to be changed. To find the index of an object, use indexOf() or lastIndexOf().
You can obtain a sublist of a list by calling subList(), specifying the beginning and ending indexes of the sublist. As you can imagine, subList() makes list processing quite convenient. One way to sort a list is with the sort() method defined by List.
Beginning with JDK 9, List includes the of() factory method, which has a number of overloads. Each version returns an unmodifiable, value-based collection that is comprised of the arguments that it is passed. The primary purpose of of() is to provide a convenient, efficient way to create a small List collection. There are 12 overloads of of(). One takes no arguments and creates an empty list. It is shown here:
static <E> List<E> of()
Ten overloads take from 1 to 10 arguments and create a list that contains the specified elements. They are shown here:
static <E> List<E> of(E obj1)

static <E> List<E> of(E obj1,E obj2)

static <E> List<E> of(E obj1,E obj2,E obj3)

...

static <E> List<E> of(E obj1,E obj2,E obj3,E obj4,E obj5,E obj6,E obj7,E obj8,E obj9,E obj10)
The final of() overload specifies a varargs parameter that takes an arbitrary number of elements or an array of elements. It is shown here:
static <E> List<E> of(E ... objs)
For all versions, null elements are not allowed. In all cases, the List implementation is unspecified.
The Set Interface
The Set interface defines a set. It extends Collection and specifies the behavior of a collection that does not allow duplicate elements. Therefore, the add() method returns false if an attempt is made to add duplicate elements to a set. With two exceptions, it does not specify any additional methods of its own. Set is a generic interface that has this declaration:
interface Set<E>
Here, E specifies the type of objects that the set will hold.
Beginning with JDK 9, Set includes the of() factory method, which has a number of overloads. Each version returns an unmodifiable, value-based collection that is comprised of the arguments that it is passed. The primary purpose of of() is to provide a convenient, efficient way to create a small Set collection. There are 12 overloads of of(). One takes no arguments and creates an empty set. It is shown here:
static <E> Set<E> of()
Ten overloads take from 1 to 10 arguments and create a list that contains the specified elements. They are shown here:
static <E> Set<E> of(E obj1)

static <E> Set<E> of(E obj1,E obj2)

static <E> Set<E> of(E obj1,E obj2,E obj3)

...

static <E> Set<E> of(E obj1,E obj2,E obj3,E obj4,E obj5,E obj6,E obj7,E obj8,E obj9,E obj10)
The final of() overload specifies a varargs parameter that takes an arbitrary number of elements or an array of elements. It is shown here:
static <E> Set<E> of(E ... objs)
For all versions, null elements are not allowed. In all cases, the Set implementation is unspecified.
Beginning with JDK 10, Set includes the static copyOf() method shown here:
static <E> Set<E> copyOf(Collection <? extends E> from)
It returns a set that contains the same elements as from. Null values are not allowed. The returned set is unmodifiable.
The SortedSet Interface
The SortedSet interface extends Set and declares the behavior of a set sorted in ascending order. SortedSet is a generic interface that has this declaration:
interface SortedSet<E>
Here, E specifies the type of objects that the set will hold.
In addition to those methods provided by Set, the SortedSet interface declares the methods summarized in Table 19-3. Several methods throw a NoSuchElementException when no items are contained in the invoking set. A ClassCastException is thrown when an object is incompatible with the elements in a set. A NullPointerException is thrown if an attempt is made to use a null object and null is not allowed in the set. An IllegalArgumentException is thrown if an invalid argument is used.
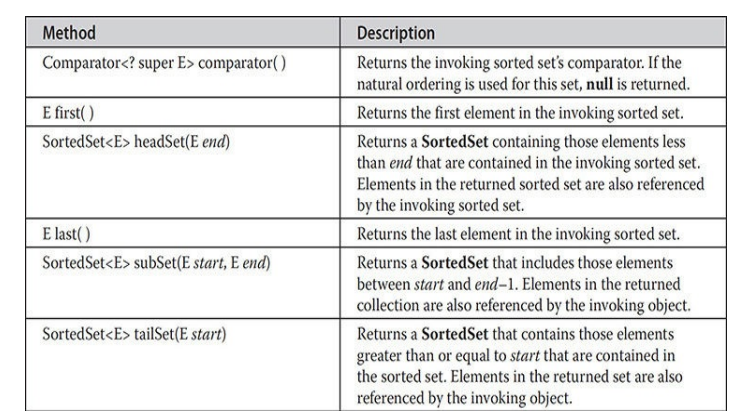
SortedSet defines several methods that make set processing more convenient. To obtain the first object in the set, call first(). To get the last element, use last(). You can obtain a subset of a sorted set by calling subSet(), specifying the first and last object in the set. If you need the subset that starts with the first element in the set, use headSet(). If you want the subset that ends the set, use tailSet().
The NavigableSet Interface
The NavigableSet interface extends SortedSet and declares the behavior of a collection that supports the retrieval of elements based on the closest match to a given value or values. NavigableSet is a generic interface that has this declaration:
interface NavigableSet<E>
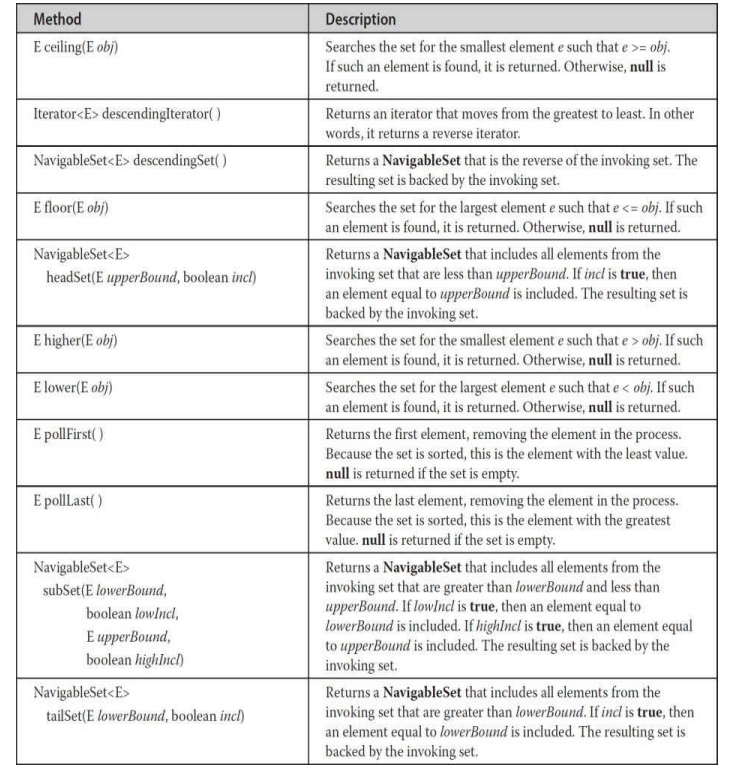
Here, E specifies the type of objects that the set will hold. In addition to the methods that it inherits from SortedSet, NavigableSet adds those summarized in Table 19-4. A ClassCastException is thrown when an object is incompatible with the elements in the set. A NullPointerException is thrown if an attempt is made to use a null object and null is not allowed in the set. An IllegalArgumentException is thrown if an invalid argument is used.
The Queue Interface
The Queue interface extends Collection and declares the behavior of a queue, which is often a first-in, first-out list. However, there are types of queues in which the ordering is based upon other criteria. Queue is a generic interface that has this declaration:
interface Queue<E>
Here, E specifies the type of objects that the queue will hold. The methods declared by Queue are shown in Table 19-5.
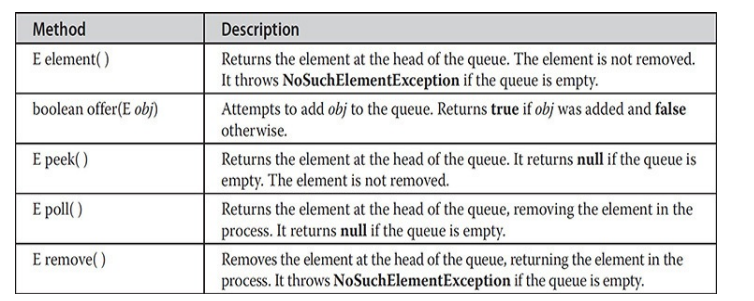
Several methods throw a ClassCastException when an object is incompatible with the elements in the queue. A NullPointerException is thrown if an attempt is made to store a null object and null elements are not allowed in the queue. An IllegalArgumentException is thrown if an invalid argument is used. An IllegalStateException is thrown if an attempt is made to add an element to a fixed-length queue that is full. A NoSuchElementException is thrown if an attempt is made to remove an element from an empty queue.
Despite its simplicity, Queue offers several points of interest. First, elements can only be removed from the head of the queue. Second, there are two methods that obtain and remove elements: poll() and remove(). The difference between them is that poll() returns null if the queue is empty, but remove() throws an exception. Third, there are two methods, element() and peek(), that obtain but don’t remove the element at the head of the queue. They differ only in that element() throws an exception if the queue is empty, but peek() returns null. Finally, notice that offer() only attempts to add an element to a queue. Because some queues have a fixed length and might be full, offer() can fail.
The Deque Interface
The Deque interface extends Queue and declares the behavior of a double- ended queue. Double-ended queues can function as standard, first-in, first-out queues or as last-in, first-out stacks. Deque is a generic interface that has this declaration:
interface Deque<E>
Here, E specifies the type of objects that the deque will hold. In addition to the methods that it inherits from Queue, Deque adds those methods summarized in Table 19-6. Several methods throw a ClassCastException when an object is incompatible with the elements in the deque. A NullPointerException is thrown if an attempt is made to store a null object and null elements are not allowed in the deque. An IllegalArgumentException is thrown if an invalid argument is used. An IllegalStateException is thrown if an attempt is made to add an element to a fixed-length deque that is full. A NoSuchElementException is thrown if an attempt is made to remove an element from an empty deque.
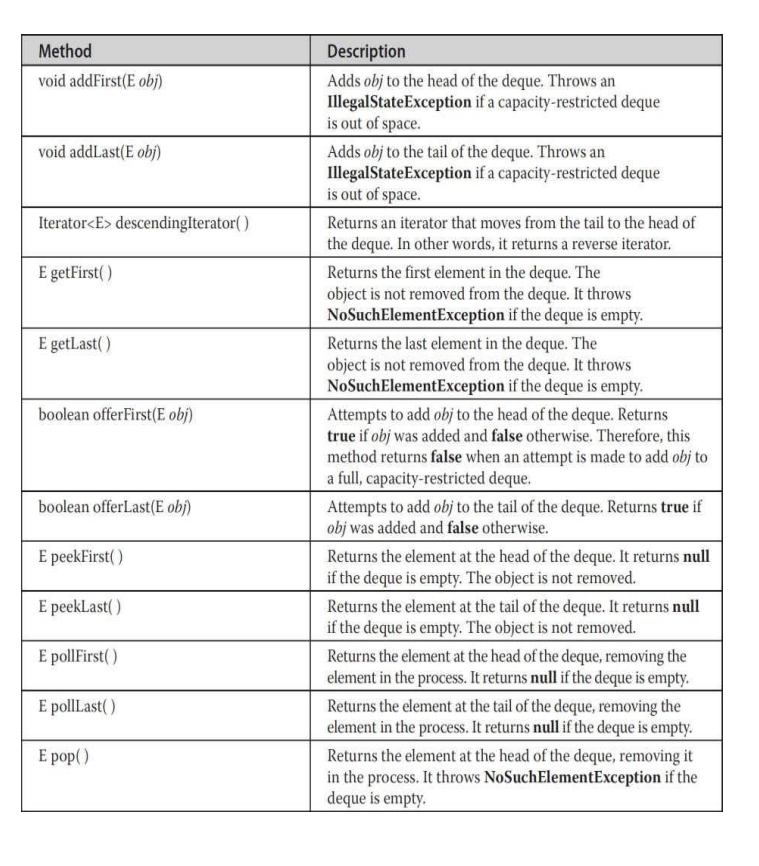

Notice that Deque includes the methods push() and pop(). These methods enable a Deque to function as a stack. Also, notice the descendingIterator() method. It returns an iterator that returns elements in reverse order. In other words, it returns an iterator that moves from the end of the collection to the start. A Deque implementation can be capacity-restricted, which means that only a limited number of elements can be added to the deque. When this is the case, an attempt to add an element to the deque can fail. Deque allows you to handle such a failure in two ways. First, methods such as addFirst() and addLast() throw an IllegalStateException if a capacity-restricted deque is full. Second, methods such as offerFirst() and offerLast() return false if the element cannot be added.
The Collection Classes
Now that you are familiar with the collection interfaces, you are ready to examine the standard classes that implement them. Some of the classes provide full implementations that can be used as-is. Others are abstract, providing skeletal implementations that are used as starting points for creating concrete collections. As a general rule, the collection classes are not synchronized, but as you will see later in this chapter, it is possible to obtain synchronized versions.
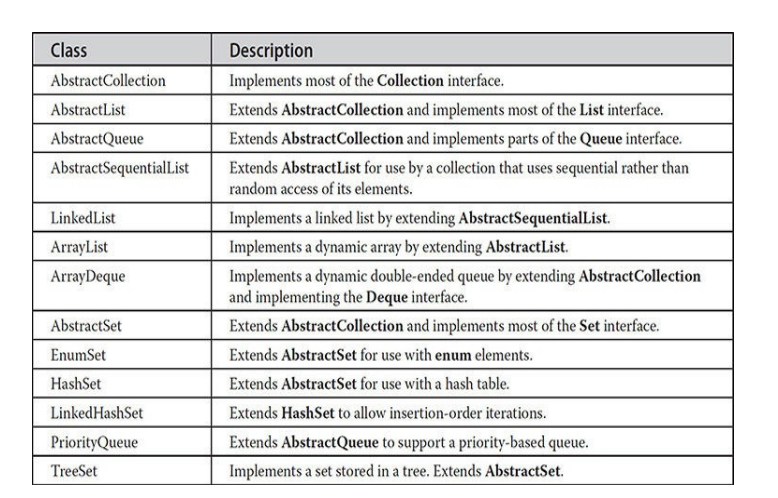
The core collection classes are summarized in the following table:
NOTE
In addition to the collection classes, several legacy classes, such as Vector, Stack, and Hashtable, have been reengineered to support collections. These are examined later in this chapter.
The ArrayList Class
The ArrayList class extends AbstractList and implements the List interface. ArrayList is a generic class that has this declaration:
class ArrayList<E>
Here, E specifies the type of objects that the list will hold. ArrayList supports dynamic arrays that can grow as needed. In Java,standard arrays are of a fixed length. After arrays are created, they cannot grow or shrink, which means that you must know in advance how many elements an array will hold. But, sometimes, you may not know until run time precisely how large an array you need. To handle this situation, the Collections Framework defines ArrayList. In essence, an ArrayList is a variable-length array of object references. That is, an ArrayList can dynamically increase or decrease in size. Array lists are created with an initial size. When this size is exceeded, the collection is automatically enlarged. When objects are removed, the array can be shrunk.
NOTE
Dynamic arrays are also supported by the legacy class Vector, which is described later in this chapter.
ArrayList has the constructors shown here:
ArrayList()
ArrayList(Collection<? extends E> c)
ArrayList(int capacity)
The first constructor builds an empty array list. The second constructor builds an array list that is initialized with the elements of the collection c. The third constructor builds an array list that has the specified initial capacity. The capacity is the size of the underlying array that is used to store the elements. The capacity grows automatically as elements are added to an array list.
The following program shows a simple use of ArrayList. An array list is created for objects of type String, and then several strings are added to it. (Recall that a quoted string is translated into a String object.) The list is then displayed. Some of the elements are removed and the list is displayed again.
// Demonstrate ArrayList. import java.util.*;
class ArrayListDemo
{
    public static void main(String args[])
    {
        // Create an array list.
        ArrayList<String> al = new ArrayList<String>();
        System.out.println("Initial size of al: " +al.size());

        // Add elements to the array list.
        al.add("C");
        al.add("A");
        al.add("E");
        al.add("B");
        al.add("D");
        al.add("F");
        al.add(1, "A2");

        System.out.println("Size of al after additions: " +  al.size());

        // Display the array list.
        System.out.println("Contents of al: " + al);

        // Remove elements from the array list.
        al.remove("F");
        al.remove (2);

        System.out.println("Size of al after deletions:"+al.size());
        System.out.println("Contents of al: " + al);
    }
}
The output from this program is shown here:
Initial size of al: 0

Size of al after additions: 7

Contents of al: [C, A2, A, E, B, D, F]

Size of al after deletions: 5

Contents of al: [C, A2, E, B, D]
Notice that a1 starts out empty and grows as elements are added to it. When elements are removed, its size is reduced.
In the preceding example, the contents of a collection are displayed using the default conversion provided by toString(), which was inherited from AbstractCollection. Although it is sufficient for short, sample programs, you seldom use this method to display the contents of a real-world collection. Usually, you provide your own output routines. But, for the next few examples, the default output created by toString() is sufficient.
Although the capacity of an ArrayList object increases automatically as objects are stored in it, you can increase the capacity of an ArrayList object manually by calling ensureCapacity(). You might want to do this if you know in advance that you will be storing many more items in the collection than it can currently hold. By increasing its capacity once, at the start, you can prevent several reallocations later. Because reallocations are costly in terms of time, preventing unnecessary ones improves performance. The signature for ensureCapacity() is shown here:
void ensureCapacity(int cap)
Here, cap specifies the new minimum capacity of the collection.
Conversely, if you want to reduce the size of the array that underlies an ArrayList object so that it is precisely as large as the number of items that it is currently holding, call trimToSize(), shown here:
void trimToSize()
Obtaining an Array from an ArrayList
When working with ArrayList, you will sometimes want to obtain an actual array that contains the contents of the list. You can do this by calling toArray(), which is defined by Collection. Several reasons exist why you might want to convert a collection into an array, such as:
- To obtain faster processing times for certain operations
- To pass an array to a method that is not overloaded to accept a collection
- To integrate collection-based code with legacy code that does not understand collections
Whatever the reason, converting an ArrayList to an array is a trivial matter. As explained earlier, there are three versions of toArray(), which are shown again here for your convenience:
object[ ] toArray()
<T> T[ ] toArray(T array[ ])
default <T> T[ ] toArray(IntFunction<T[ ]> arrayGen)
The first returns an array of Object. The second and third forms return an array of elements that have the same type as T. Here, we will use the second form because of its convenience. The following program shows it in action.
// Convert an ArrayList into an array.
import java.util.*;
class ArrayListToArray
{
    public static void main(String args[])
    {
        // Create an array list.
        ArrayList<Integer> al = new ArrayList<Integer>();

        // Add elements to the array list.
        al.add(1);
        al.add(2);
        al.add(3);
        al.add(4);

        System.out.println("Contents of al: " + al);

        // Get the array.
        Integer ia[] = new Integer [al.size()];
        ia = al.toArray(ia) ;

        int sum = 0;
        // Sum the array.
        for (int i : ia)
        sum += i;

        System.out.println("Sum is: " + sum);
    }
}
The output from the program is shown here:
Contents of al: [1, 2, 3, 4]

Sum is: 10
The program begins by creating a collection of integers. Next, toArray() is called and it obtains an array of Integers. Then, the contents of that array are summed by use of a for-each style for loop.
There is something else of interest in this program. As you know, collections can store only references, not values of primitive types. However, autoboxing makes it possible to pass values of type int to add() without having to manually wrap them within an Integer, as the program shows. Autoboxing causes them to be automatically wrapped. In this way, autoboxing significantly improves the ease with which collections can be used to store primitive values.
The LinkedList Class
The LinkedList class extends AbstractSequentialList and implements the List, Deque, and Queue interfaces. It provides a linked-list data structure. LinkedList is a generic class that has this declaration:
class LinkedList<E>
Here, E specifies the type of objects that the list will hold. LinkedList has the two constructors shown here:
LinkedList() LinkedList(Collection<? extends E> c)
The first constructor builds an empty linked list. The second constructor builds a linked list that is initialized with the elements of the collection c.
Because LinkedList implements the Deque interface, you have access to the methods defined by Deque. For example, to add elements to the start of a list, you can use addFirst() or offerFirst(). To add elements to the end of the list, use addLast() or offerLast(). To obtain the first element, you can use getFirst() or peekFirst(). To obtain the last element, use getLast() or peekLast(). To remove the first element, use removeFirst() or pollFirst(). To remove the last element, use removeLast() or pollLast().
The following program illustrates LinkedList:
// Demonstrate LinkedList.
import java.util.*;
class LinkedListDemo
{
    public static void main(String args[])
    {
        // Create a linked list.
        LinkedList<String> 11 = new LinkedList<String>();
        // Add elements to the linked list.
        11.add("F");
        11.add("B");
        11.add("D");
        11.add("E");
        11.add("C");
        11.addLast ("Z");
        11.addFirst("A");
        11.add(1, "A2");
        System.out.println("Original contents of 11: " + 11);

        // Remove elements from the linked list.
        11.remove("F");
        11.remove (2);
        System.out.println("Contents of 11 after deletion: "+ 11);

        // Remove first and last elements.
        11.removeFirst();
        11.removeLast();
        System.out.println("11 after deleting first and last: " +11);

        // Get and set a value.
        String val = 11.get(2);
        11.set(2, val + " Changed");
        System.out.println("11 after change: " + 11);
    }
}
The output from this program is shown here:
Original contents of ll: [A, A2, F, B, D, E, C, Z]

Contents of ll after deletion: [A, A2, D, E, C, Z]

ll after deleting first and last: [A2, D, E, C]

ll after change: [A2, D, E Changed, C]
Because LinkedList implements the List interface, calls to add(E) append items to the end of the list, as do calls to addLast(). To insert items at a specific location, use the add(int, E) form of add(), as illustrated by the call to add(1, “A2”) in the example.
Notice how the third element in ll is changed by employing calls to get() and set(). To obtain the current value of an element, pass get() the index at which the element is stored. To assign a new value to that index, pass set() the index and its new value.
The HashSet Class
HashSet extends AbstractSet and implements the Set interface. It creates a collection that uses a hash table for storage. HashSet is a generic class that has this declaration:
class HashSet<E>
Here, E specifies the type of objects that the set will hold.
As most readers likely know, a hash table stores information by using a mechanism called hashing. In hashing, the informational content of a key is used to determine a unique value, called its hash code. The hash code is then used as the index at which the data associated with the key is stored. The transformation of the key into its hash code is performed automatically—you never see the hash code itself. Also, your code can’t directly index the hash table. The advantage of hashing is that it allows the execution time of add(), contains(), remove(), and size() to remain constant even for large sets.
The following constructors are defined:
HashSet()
HashSet(Collection<? extends E> c)
HashSet(int capacity)
HashSet(int capacity, float fillRatio)
The first form constructs a default hash set. The second form initializes the hash set by using the elements of c. The third form initializes the capacity of the hash set to capacity. (The default capacity is 16.) The fourth form initializes both the capacity and the fill ratio (also called load factor) of the hash set from its arguments. The fill ratio must be between 0.0 and 1.0, and it determines how full the hash set can be before it is resized upward. Specifically, when the number of elements is greater than the capacity of the hash set multiplied by its fill ratio, the hash set is expanded. For constructors that do not take a fill ratio, 0.75 is used.
HashSet does not define any additional methods beyond those provided by its superclasses and interfaces.
It is important to note that HashSet does not guarantee the order of its elements, because the process of hashing doesn’t usually lend itself to the creation of sorted sets. If you need sorted storage, then another collection, such as TreeSet, is a better choice.
Here is an example that demonstrates HashSet:
// Demonstrate HashSet.
import java.util.*;
class HashSetDemo
{
    public static void main(String args[])
    {
        // Create a hash set.
        HashSet<String> hs = new HashSet<String>();

        // Add elements to the hash set.
        hs.add("Beta");
        hs.add("Alpha");
        hs.add("Eta");
        hs.add("Gamma");
        hs.add("Epsilon");
        hs.add("Omega");

        System.out.println (hs);
    }
}
The following is the output from this program:
[Gamma, Eta, Alpha, Epsilon, Omega, Beta]
As explained, the elements are not stored in sorted order, and the precise output may vary.
The LinkedHashSet Class
The LinkedHashSet class extends HashSet and adds no members of its own. It is a generic class that has this declaration:
class LinkedHashSet<E>
Here, E specifies the type of objects that the set will hold. Its constructors parallel those in HashSet.
LinkedHashSetmaintains a linked list of the entries in the set, in the order in which they were inserted. This allows insertion-order iteration over the set. That is, when cycling through a LinkedHashSet using an iterator, the elements will be returned in the order in which they were inserted. This is also the order in which they are contained in the string returned by toString() when called on a LinkedHashSet object. To see the effect of LinkedHashSet, try substituting LinkedHashSet for HashSet in the preceding program. The output will be
[Beta, Alpha, Eta, Gamma, Epsilon, Omega]
which is the order in which the elements were inserted.
The TreeSet Class
TreeSet extends AbstractSet and implements the NavigableSet interface. It creates a collection that uses a tree for storage. Objects are stored in sorted, ascending order. Access and retrieval times are quite fast, which makes TreeSet an excellent choice when storing large amounts of sorted information that must be found quickly.
TreeSetis a generic class that has this declaration:
class TreeSet<E>
Here, E specifies the type of objects that the set will hold. TreeSet has the following constructors:
TreeSet()
TreeSet(Collection<? extends E> c)
TreeSet(Comparator<? super E> comp)
TreeSet(SortedSet<E> ss)
The first form constructs an empty tree set that will be sorted in ascending order according to the natural order of its elements. The second form builds a tree set that contains the elements of c. The third form constructs an empty tree set that will be sorted according to the comparator specified by comp. (Comparators are described later in this chapter.) The fourth form builds a tree set that contains the elements of ss.
Here is an example that demonstrates a TreeSet:
// Demonstrate TreeSet. import java.util.*;
class TreeSetDemo
{
    public static void main(String args[])
    {
        // Create a tree set.
        TreeSet<String> ts = new TreeSet<String>();

        // Add elements to the tree set.
        ts.add("C");
        ts.add("A");
        ts.add("B");
        ts.add("E");
        ts.add("F");
        ts.add("D");
        System.out.println(ts);
    }
}
The output from this program is shown here:
[A, B, C, D, E, F]
As explained, because TreeSet stores its elements in a tree, they are automatically arranged in sorted order, as the output confirms.
Because TreeSet implements the NavigableSet interface, you can use the methods defined by NavigableSet to retrieve elements of a TreeSet. For example, assuming the preceding program, the following statement uses subSet() to obtain a subset of ts that contains the elements between C (inclusive) and F (exclusive). It then displays the resulting set.
System.out.println(ts.subSet("C", "F"));
The output from this statement is shown here:
[C, D, E]
You might want to experiment with the other methods defined by NavigableSet.
The PriorityQueue Class
PriorityQueue extends AbstractQueue and implements the Queue interface. It creates a queue that is prioritized based on the queue’s comparator. PriorityQueue is a generic class that has this declaration:
class PriorityQueue<E>
Here, E specifies the type of objects stored in the queue. PriorityQueues are dynamic, growing as necessary.
PriorityQueuedefines the seven constructors shown here:
PriorityQueue()
PriorityQueue(int capacity)
PriorityQueue(Comparator<? super E> comp)
PriorityQueue(int capacity, Comparator<? super E> comp)
PriorityQueue(Collection<? extends E> c)
PriorityQueue(PriorityQueue<? extends E> c)
PriorityQueue(SortedSet<? extends E> c)
The first constructor builds an empty queue. Its starting capacity is 11. The second constructor builds a queue that has the specified initial capacity. The third constructor specifies a comparator, and the fourth builds a queue with the specified capacity and comparator. The last three constructors create queues that are initialized with the elements of the collection passed in c. In all cases, the capacity grows automatically as elements are added.
If no comparator is specified when a PriorityQueue is constructed, then the default comparator for the type of data stored in the queue is used. The default comparator will order the queue in ascending order. Thus, the head of the queue will be the smallest value. However, by providing a custom comparator, you can specify a different ordering scheme. For example, when storing items that include a time stamp, you could prioritize the queue such that the oldest items are first in the queue.
You can obtain a reference to the comparator used by a PriorityQueue by calling its comparator() method, shown here:
Comparator<? super E> comparator()
It returns the comparator. If natural ordering is used for the invoking queue, null is returned.One word of caution: Although you can iterate through a PriorityQueue using an iterator, the order of that iteration is undefined. To properly use a PriorityQueue, you must call methods such as offer() and poll(), which are defined by the Queue interface.
The ArrayDeque Class
The ArrayDeque class extends AbstractCollection and implements the Deque interface. It adds no methods of its own. ArrayDeque creates a dynamic array and has no capacity restrictions. (The Deque interface supports implementations that restrict capacity, but does not require such restrictions.) ArrayDeque is a generic class that has this declaration:
class ArrayDeque<E>
Here, E specifies the type of objects stored in the collection. ArrayDeque defines the following constructors:
ArrayDeque()
ArrayDeque(int size)
ArrayDeque(Collection<? extends E> c)
The first constructor builds an empty deque. Its starting capacity is 16. The second constructor builds a deque that has the specified initial capacity. The third constructor creates a deque that is initialized with the elements of the collection passed in c. In all cases, the capacity grows as needed to handle the elements added to the deque.
The following program demonstrates ArrayDeque by using it to create a stack:
// Demonstrate ArrayDeque.
import java.util.*;

class ArrayDequeDemo
{
    public static void main(String args[])
    {
        // Create an array deque.
        ArrayDeque<String> adq = new ArrayDeque<String>();

        // Use an ArrayDeque like a stack.
        adq.push("A");
        adq.push("B");
        adq.push("D");
        adq.push("E");
        adq.push("F");
        System.out.print ("Popping the stack: ");

        while (adq.peek() != null)
            System.out.print(adq.pop()+" ");

        System.out.println();
    }
}
The output is shown here:
Popping the stack: F E D B A
The EnumSet Class
EnumSetextends AbstractSet and implements Set. It is specifically for use with elements of an enum type. It is a generic class that has this declaration:
class EnumSet<E extends Enum<E>>
Here, E specifies the elements. Notice that E must extend Enum
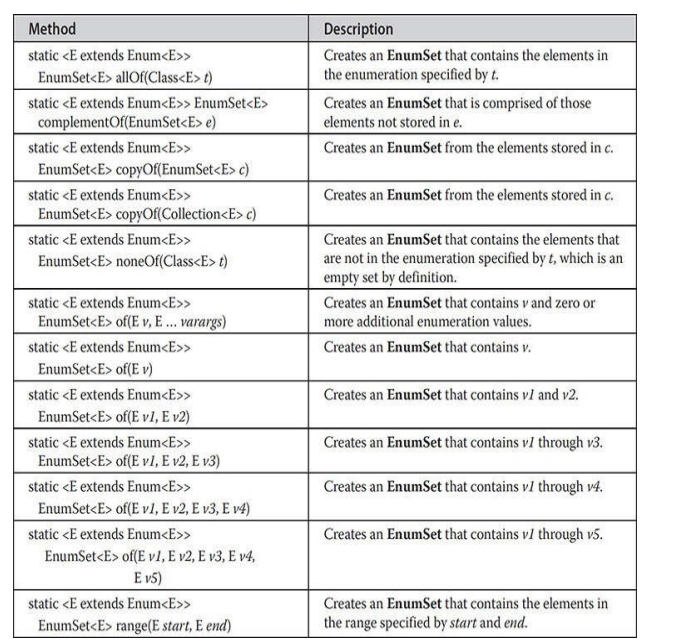
EnumSet defines no constructors. Instead, it uses the factory methods shown in Table 19-7 to create objects. All methods can throw NullPointerException. The copyOf() and range() methods can also throw IllegalArgumentException. Notice that the of() method is overloaded a number of times. This is in the interest of efficiency. Passing a known number of arguments can be faster than using a vararg parameter when the number of arguments is small.
Accessing a Collection via an Iterator
Often, you will want to cycle through the elements in a collection. For example, you might want to display each element. One way to do this is to employ an iterator, which is an object that implements either the Iterator or the ListIterator interface. Iterator enables you to cycle through a collection, obtaining or removing elements. ListIterator extends Iterator to allow bidirectional traversal of a list, and the modification of elements. Iterator and ListIterator are generic interfaces which are declared as shown here:
interface Iterator<E>
interface ListIterator<E>
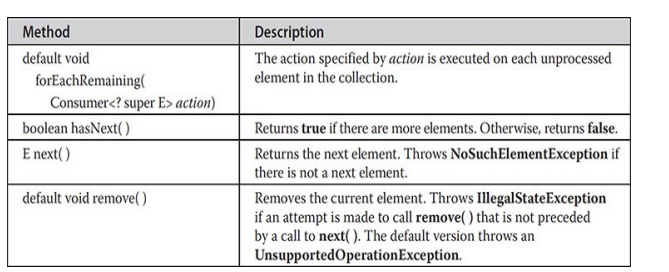
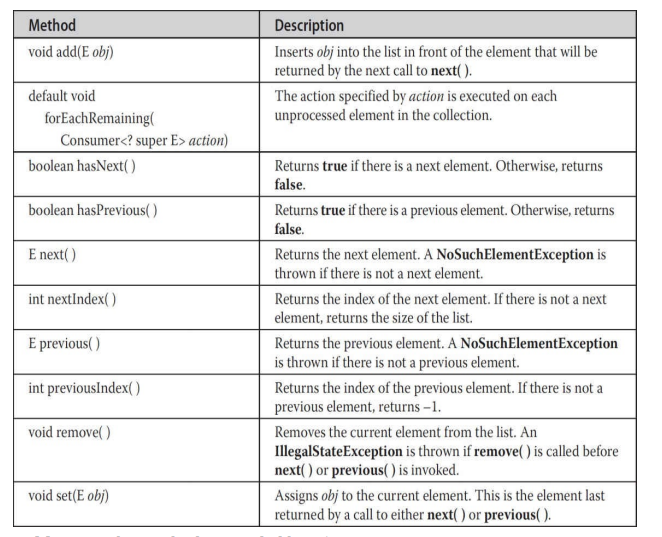
Here, E specifies the type of objects being iterated. The Iterator interface declares the methods shown in Table 19-8. The methods declared by ListIterator (along with those inherited from Iterator) are shown in Table 19- 9. In both cases, operations that modify the underlying collection are optional. For example, remove() will throw UnsupportedOperationException when used with a read-only collection. Various other exceptions are possible.
NOTE
Beginning with JDK 8, you can also use a Spliterator to cycle through a collection. Spliterator works differently than does Iterator, and it is described later in this chapter.
Using an Iterator
Before you can access a collection through an iterator, you must obtain one. Each of the collection classes provides an iterator() method that returns an iterator to the start of the collection. By using this iterator object, you can access each element in the collection, one element at a time. In general, to use an iterator to cycle through the contents of a collection, follow these steps:
-
Obtain an iterator to the start of the collection by calling the collection’s iterator() method.
-
Set up a loop that makes a call to hasNext(). Have the loop iterate as long as hasNext() returns true.
-
Within the loop, obtain each element by calling next().
For collections that implement List, you can also obtain an iterator by calling listIterator(). As explained, a list iterator gives you the ability to access the collection in either the forward or backward direction and lets you modify an element. Otherwise, ListIterator is used just like Iterator.
The following example implements these steps, demonstrating both the Iterator and ListIterator interfaces. It uses an ArrayList object, but the general principles apply to any type of collection. Of course, ListIterator is available only to those collections that implement the List interface.
// Demonstrate iterators.
import java.util.*;

class IteratorDemo
{
    public static void main(String args[])
    {
        // Create an array list.
        ArrayList<String> al = new ArrayList<String>();

        // Add elements to the array list.
        al.add("C");
        al.add("A");
        al.add("E");
        al.add("B");
        al.add("D");
        al.add("F");

        // Use iterator to display contents of al.
        System.out.print ("Original contents of al: ");
        Iterator<String> itr = al.iterator();
        while (itr.hasNext())
        {
            String element itr.next();
            System.out.print (element + " ");
        }
        System.out.println();

        // Modify objects being iterated.
        ListIterator<String> litr = al.listIterator();
        while (litr.hasNext())
        {
            String element = litr.next();
            litr.set (element + "+");
        }

        System.out.print ("Modified contents of al: ");
        itr = al.iterator();
        while (itr.hasNext())
        {
            String element = itr.next();
            System.out.print (element + " ");
        }
        System.out.println();

        // Now, display the list backwards.
        System.out.print ("Modified list backwards: ");
        while (litr.hasPrevious ())
        {
            String element = litr.previous ();
            System.out.print(element + " ");
        }
        System.out.println();
    }
}
The output is shown here:
Original contents of al: C A E B D F

Modified contents of al: C+ A+ E+ B+ D+ F+

Modified list backwards: F+ D+ B+ E+ A+ C+
Pay special attention to how the list is displayed in reverse. After the list is modified, litr points to the end of the list. (Remember, litr.hasNext() returns false when the end of the list has been reached.) To traverse the list in reverse, the program continues to use litr, but this time it checks to see whether it has a previous element. As long as it does, that element is obtained and displayed.
The For-Each Alternative to Iterators
If you won’t be modifying the contents of a collection or obtaining elements in reverse order, then the for-each version of the for loop is often a more convenient alternative to cycling through a collection than is using an iterator. Recall that the for can cycle through any collection of objects that implement the Iterable interface. Because all of the collection classes implement this interface, they can all be operated upon by the for.
The following example uses a for loop to sum the contents of a collection:
// Use the for-each for loop to cycle through a collection.
import java.util.*;
class ForEachDemo
{
    public static void main(String args[])
    {
        // Create an array list for integers.
        ArrayList<Integer> vals = new ArrayList<Integer>();

        // Add values to the array list.
        vals.add(1);
        vals.add(2);
        vals.add(3);
        vals.add(4);
        vals.add(5);

        // Use for loop to display the values.
        System.out.print ("Contents of vals: ");
        for (int v : vals)
            System.out.print (v + " ");

        System.out.println();

        // Now, sum the values by using a for loop.
        int sum = 0;
        for (int v : vals)
            sum += V;

        System.out.println("Sum of values: " + sum);
    }
}
The output from the program is shown here:
Contents of vals: 1 2 3 4 5

Sum of values: 15
As you can see, the for loop is substantially shorter and simpler to use than the iterator-based approach. However, it can only be used to cycle through a collection in the forward direction, and you can’t modify the contents of the collection.
Spliterators
JDK 8 added another type of iterator called a spliterator that is defined by the Spliterator interface. A spliterator cycles through a sequence of elements, and in this regard, it is similar to the iterators just described. However, the techniques required to use it differ. Furthermore, it offers substantially more functionality than does either Iterator or ListIterator. Perhaps the most important aspect of Spliterator is its ability to provide support for parallel iteration of portions of the sequence. Thus, Spliterator supports parallel programming. (See Chapter 28 for information on concurrency and parallel programming.) However, you can use Spliterator even if you won’t be using parallel execution. One reason you might want to do so is because it offers a streamlined approach that combines the hasNext and next operations into one method.
Spliteratoris a generic interface that is declared like this:
interface Spliterator<T>
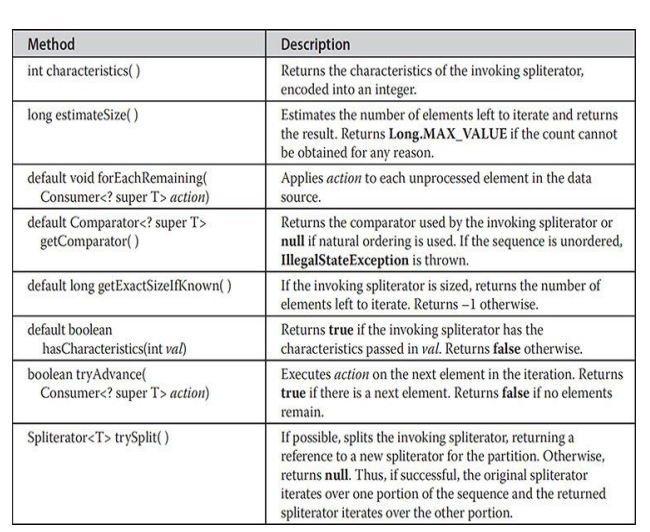
Here, T is the type of elements being iterated. Spliterator declares the methods shown in Table 19-10.
Using Spliterator for basic iteration tasks is quite easy: simply call tryAdvance() until it returns false. If you will be applying the same action to each element in the sequence, forEachRemaining() offers a streamlined alternative. In both cases, the action that will occur with each iteration is defined by what the Consumer object does with each element. Consumer is a functional interface that applies an action to an object. It is a generic functional interface declared in java.util.function. (See Chapter 20 for information on java.util.function.) Consumer specifies only one abstract method, accept(), which is shown here:
void accept(T objRef)
In the case of tryAdvance(), each iteration passes the next element in the sequence to objRef. Often, the easiest way to implement Consumer is by use of a lambda expression.
The following program provides a simple example of Spliterator. Notice that the program demonstrates both tryAdvance() and forEachRemaining(). Also notice how these methods combine the actions of Iterator’s next() and hasNext() methods into a single call.
// A simple Spliterator demonstration.
import java.util.*;

class SpliteratorDemo
{
    public static void main(String args[])
    {
        // Create an array list for doubles.
        ArrayList<Double> vals = new ArrayList<>();

        // Add values to the array list.
        vals.add(1.0);
        vals.add(2.0);
        vals.add(3.0);
        vals.add(4.0);
        vals.add(5.0);

        // Use tryAdvance() to display contents of vals.
        System.out.print("Contents of vals: \n");
        Spliterator<Double> spltitr = vals.spliterator();
        while (spltitr.tryAdvance ((n) -> System.out.println(n)));
        System.out.println();

        // Create new list that contains square roots.
        spltitr = vals.spliterator();
        ArrayList<Double> sqrs = new ArrayList<>();
        while (spltitr.tryAdvance ((n) -> sqrs.add (Math.sqrt (n))));

        // Use forEachRemaining() to display contents of sqrs.
        System.out.print("Contents of sqrs:\n");
        spltitr = sqrs.spliterator();
        spltitr.forEachRemaining ((n) -> System.out.println(n));
        System.out.println();
    }
}
The output is shown here:
Contents of vals:

1.0

2.0

3.0

4.0

5.0

Contents of sqrs:

1.0

1.4142135623730951

1.7320508075688772

2.0

2.23606797749979
Although this program demonstrates the mechanics of using Spliterator, it does not reveal its full power. As mentioned, Spliterator’s maximum benefit is found in situations that involve parallel processing.
In Table 19-10, notice the methods characteristics() and hasCharacteristics(). Each Spliterator has a set of attributes, called characteristics, associated with it. These are defined by static int fields in Spliterator, such as SORTED, DISTINCT, SIZED, and IMMUTABLE, to name a few. You can obtain the characteristics by calling characteristics(). You can determine if a characteristic is present by calling hasCharacteristics(). Often, you won’t need to access a Spliterator’s characteristics, but in some cases, they can aid in creating efficient, resilient code.
NOTE
For a further discussion of Spliterator, see Chapter 29, where it is used in the context of the stream API. For a discussion of lambda expressions, see Chapter 15. See Chapter 28 for a discussion of parallel programming and concurrency.
There are several nested subinterfaces of Spliterator designed for use with the primitive types double, int, and long. These are called Spliterator.OfDouble, Spliterator.OfInt, and Spliterator.OfLong. There is also a generalized version called Spliterator.OfPrimitive(), which offers additional flexibility and serves as a superinterface of the aforementioned ones.
Storing User-Defined Classes in Collections
For the sake of simplicity, the foregoing examples have stored built-in objects, such as String or Integer, in a collection. Of course, collections are not limited to the storage of built-in objects. Quite the contrary. The power of collections is that they can store any type of object, including objects of classes that you create. For example, consider the following example that uses a LinkedList to store mailing addresses:
// A simple mailing list example. import java.util.*;
class Address
{
    private String name;
    private String street;
    private String city;
    private String state;
    private String code;

    Address (String n, String s, String c, String st, String cd)
    {
        name= n;
        street S;
        city= c;
        state = st;
        code = cd;
    }
    public String toString()
    {
        return name + "\n" + street + "\n" + city"" + state + "" + code;
    }
}
class Maillist
{
    public static void main(String args[])
    {
        LinkedList<Address> ml = new LinkedList<Address>();

        // Add elements to the linked list.
        ml.add(new Address("J.W. West", "11 Oak Ave","Urbana", "IL", "61801"));
        ml.add(new Address ("Ralph Baker","1142 Maple Lane", "Mahomet", "IL","61853"));
        ml.add(new Address ("Tom Carlton", "867 Elm St", "Champaign", "IL", "61820"));

        // Display the mailing list.
        for (Address element: ml)
            System.out.println(element + "\n");

        System.out.println();
    }
}
The output from the program is shown here:
J.W. West

11 Oak Ave

Urbana IL 61801

Ralph Baker

1142 Maple Lane

Mahomet IL 61853

Tom Carlton

867 Elm St

Champaign IL 61820
Aside from storing a user-defined class in a collection, another important thing to notice about the preceding program is that it is quite short. When you consider that it sets up a linked list that can store, retrieve, and process mailing addresses in about 50 lines of code, the power of the Collections Framework begins to become apparent. As most readers know, if all of this functionality had to be coded manually, the program would be several times longer. Collections offer off-the-shelf solutions to a wide variety of programming problems. You should use them whenever the situation presents itself.
The RandomAccess Interface
The RandomAccess interface contains no members. However, by implementing this interface, a collection signals that it supports efficient random access to its elements. Although a collection might support random access, it might not do so efficiently. By checking for the RandomAccess interface, client code can determine at run time whether a collection is suitable for certain types of random access operations—especially as they apply to large collections. (You can use instanceof to determine if a class implements an interface.) RandomAccess is implemented by ArrayList and by the legacy Vector class, among others.
Working with Maps
A map is an object that stores associations between keys and values, or key/value pairs. Given a key, you can find its value. Both keys and values are objects. The keys must be unique, but the values may be duplicated. Some maps can accept a null key and null values, others cannot.
There is one key point about maps that is important to mention at the outset: they don’t implement the Iterable interface. This means that you cannot cycle through a map using a for-each style for loop. Furthermore, you can’t obtain an iterator to a map. However, as you will soon see, you can obtain a collection- view of a map, which does allow the use of either the for loop or an iterator.
The Map Interfaces
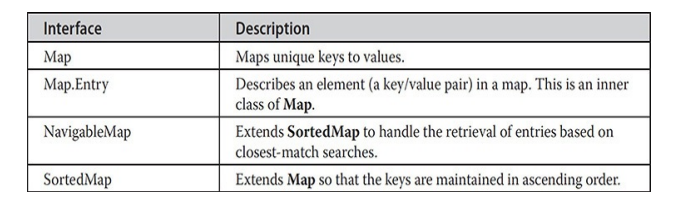
Because the map interfaces define the character and nature of maps, this discussion of maps begins with them. The following interfaces support maps:
The Map interface maps unique keys to values. A key is an object that you use to retrieve a value at a later date. Given a key and a value, you can store the value in a Map object. After the value is stored, you can retrieve it by using its key. Map is generic and is declared as shown here:
interface Map<K, V>
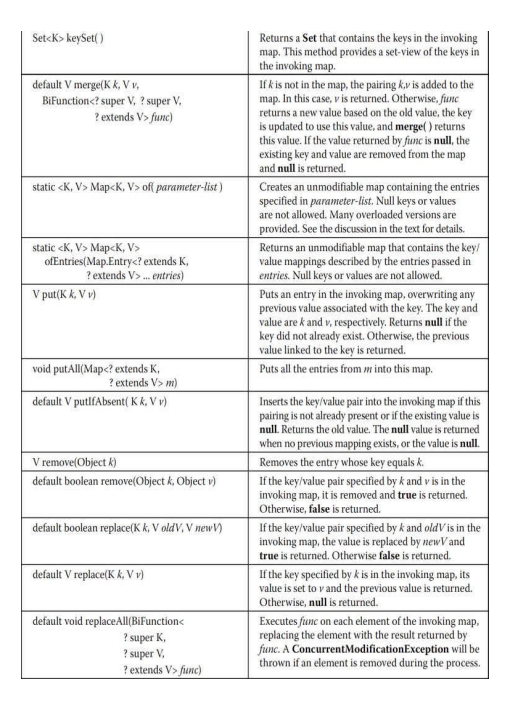
Here, K specifies the type of keys, and V specifies the type of values. The methods declared by Map are summarized in Table 19-11. Several
methods throw a ClassCastException when an object is incompatible with the elements in a map. A NullPointerException is thrown if an attempt is made to use a null object and null is not allowed in the map. An UnsupportedOperationException is thrown when an attempt is made to change an unmodifiable map. An IllegalArgumentException is thrown if an
invalid argument is used.
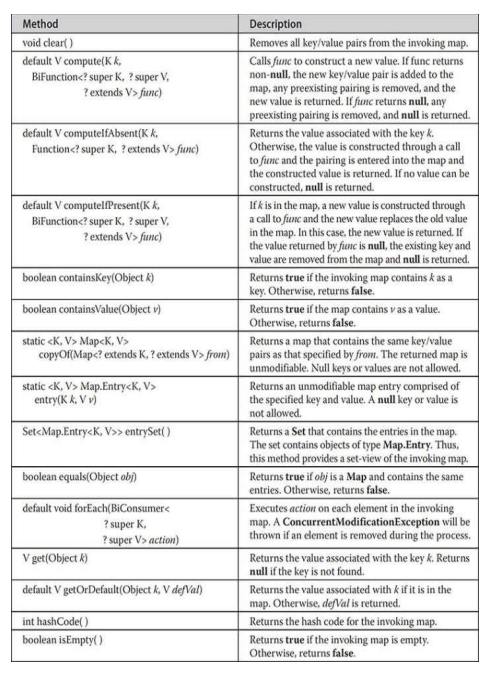

Maps revolve around two basic operations: get() and put(). To put a value into a map, use put(), specifying the key and the value. To obtain a value, call get(), passing the key as an argument. The value is returned.
As mentioned earlier, although part of the Collections Framework, maps are not, themselves, collections because they do not implement the Collection interface. However, you can obtain a collection-view of a map. To do this, you can use the entrySet() method. It returns a Set that contains the elements in the map. To obtain a collection-view of the keys, use keySet(). To get a collection-view of the values, use values(). For all three collection-views, the collection is backed by the map. Changing one affects the other. Collection- views are the means by which maps are integrated into the larger Collections Framework.
Beginning with JDK 9, Map includes the of() factory method, which has a number of overloads. Each version returns an unmodifiable, value-based map that is comprised of the arguments that it is passed. The primary purpose of of() is to provide a convenient, efficient way to create a small Map. There are 11 overloads of of(). One takes no arguments and creates an empty map. It is shown here:
static <K, V> Map<K, V> of()
Ten overloads take from 1 to 10 arguments and create a list that contains the specified elements. They are shown here:
static <K, V> Map<K, V> of(K k1,V v1)
static <K, V> Map<K, V> of(K k1,V v1,K k2,V v2)
static <K, V> Map<K, V> of(K k1,V v1,K k2,V v2,K k3,V v3)
....
static <K, V> Map<K, V> of(K k1,V v1,K k2,V v2,K k3,V v3,K k4,V v4,K k5,V v5,K k6,V v6,K k7,V v7,K k8,V v8,K k9,V v9,K k10,V v10)
For all versions, null keys and/or values are not allowed. In all cases, the Map implementation is unspecified.
The SortedMap Interface
The SortedMap interface extends Map. It ensures that the entries are maintained in ascending order based on the keys. SortedMap is generic and is declared as shown here:
interface SortedMap<K, V>
Here, K specifies the type of keys, and V specifies the type of values. The methods declared by SortedMap are summarized in Table 19-12.
Several methods throw a NoSuchElementException when no items are in the invoking map. A ClassCastException is thrown when an object is incompatible with the elements in a map. A NullPointerException is thrown if an attempt is made to use a null object when null is not allowed in the map. An IllegalArgumentException is thrown if an invalid argument is used.
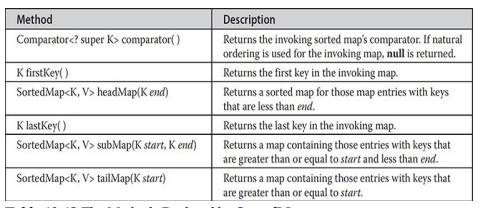
Sorted maps allow very efficient manipulations of submaps (in other words, subsets of a map). To obtain a submap, use headMap(), tailMap(), or subMap(). The submap returned by these methods is backed by the invoking map. Changing one changes the other. To get the first key in the set, call firstKey(). To get the last key, use lastKey().
The NavigableMap Interface
The NavigableMap interface extends SortedMap and declares the behavior of a map that supports the retrieval of entries based on the closest match to a given key or keys. NavigableMap is a generic interface that has this declaration:
interface NavigableMap<K,V>
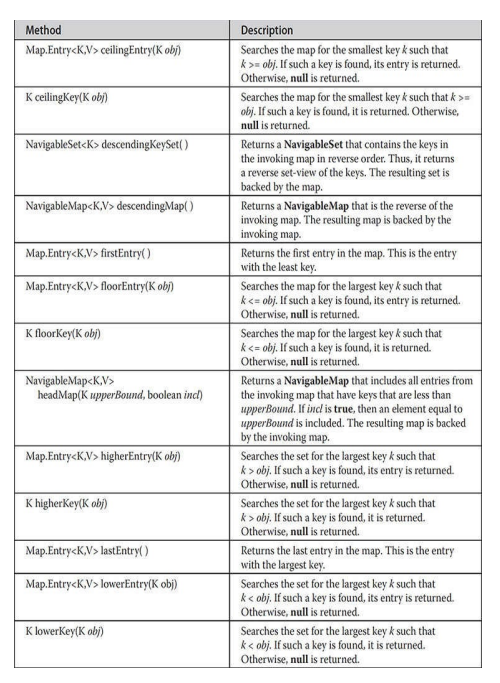
Here, K specifies the type of the keys, and V specifies the type of the values associated with the keys. In addition to the methods that it inherits from SortedMap, NavigableMap adds those summarized in Table 19-13. Several methods throw a ClassCastException when an object is incompatible with the keys in the map. A NullPointerException is thrown if an attempt is made to use a null object and null keys are not allowed in the set. An IllegalArgumentException is thrown if an invalid argument is used.

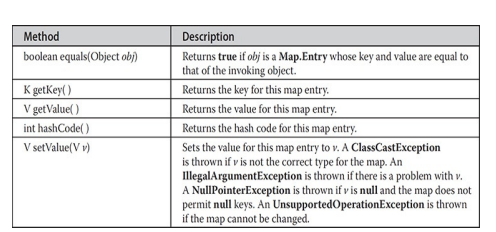
The Map.Entry Interface
The Map.Entry interface enables you to work with a map entry. For example, recall that the entrySet() method declared by the Map interface returns a Set containing the map entries. Each of these set elements is a Map.Entry object. Map.Entry is generic and is declared like this:
interface Map.Entry<K, V>
Here, K specifies the type of keys, and V specifies the type of values. Table 19- 14 summarizes the non-static methods declared by Map.Entry. It also has two static methods. The first is comparingByKey(), which returns a Comparator that compares entries by key. The second is comparingByValue(), which returns a Comparator that compares entries by value.
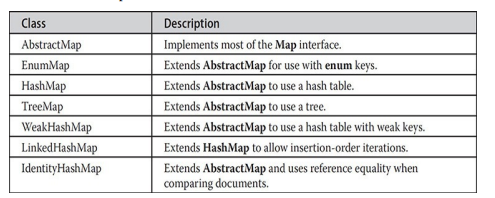
The Map Classes
Several classes provide implementations of the map interfaces. The classes that can be used for maps are summarized here:
The HashMap Class
The HashMap class extends AbstractMap and implements the Map interface. It uses a hash table to store the map. This allows the execution time of get() and put() to remain constant even for large sets. HashMap is a generic class that has this declaration:
class HashMap<K, V>
Here, K specifies the type of keys, and V specifies the type of values. The following constructors are defined:
HashMap()
HashMap(Map<? extends K, ? extends V> m)
HashMap(int capacity)
HashMap(int capacity, float fillRatio)
The first form constructs a default hash map. The second form initializes the hash map by using the elements of m. The third form initializes the capacity of the hash map to capacity. The fourth form initializes both the capacity and fill ratio of the hash map by using its arguments. The meaning of capacity and fill ratio is the same as for HashSet, described earlier. The default capacity is 16. The default fill ratio is 0.75.
HashMap implements Map and extends AbstractMap. It does not add any methods of its own.
You should note that a hash map does not guarantee the order of its elements. Therefore, the order in which elements are added to a hash map is not necessarily the order in which they are read by an iterator.
The following program illustrates HashMap. It maps names to account balances. Notice how a set-view is obtained and used.
import java.util.*;
class HashMapDemo
{
    public static void main(String args[])
    {
        // Create a hash map.
        HashMap<String, Double> hm = new HashMap<String, Double>();

        // Put elements to the map
        hm.put("John Doe", 3434.34);
        hm.put("Tom Smith", 123.22);
        hm.put("Jane Baker", 1378.00);
        hm.put("Tod Hall", 99.22);
        hm.put("Ralph Smith", -19.08);

        // Get a set of the entries.
        Set<Map.Entry<String, Double>> set = hm.entrySet();

        // Display the set.
        for (Map.Entry<String, Double> me : set)
        {
            System.out.print (me.getKey() + ": ");
            System.out.println(me.getValue());
        }
        System.out.println();

        // Deposit 1000 into John Doe's account.
        double balance = hm.get ("John Doe");
        hm.put("John Doe", balance + 1000);

        System.out.println("John Doe new balance: "+hm.get("John Doe"));
    }
}
Output from this program is shown here (the precise order may vary):
Ralph Smith: -19.08.
Jane Baker: 1378.0
Tom Smith: 123.22
John Doe: 3434.34
Tod Hall: 99.22

John Doe new balance: 4434.34
The program begins by creating a hash map and then adds the mapping of names to balances. Next, the contents of the map are displayed by using a set- view, obtained by calling entrySet(). The keys and values are displayed by calling the getKey() and getValue() methods that are defined by Map.Entry. Pay close attention to how the deposit is made into John Doe’s account. The put() method automatically replaces any preexisting value that is associated with the specified key with the new value. Thus, after John Doe’s account is updated, the hash map will still contain just one “John Doe” account.
The TreeMap Class
The TreeMap class extends AbstractMap and implements the NavigableMap interface. It creates maps stored in a tree structure. A TreeMap provides an efficient means of storing key/value pairs in sorted order and allows rapid retrieval. You should note that, unlike a hash map, a tree map guarantees that its elements will be sorted in ascending key order. TreeMap is a generic class that has this declaration:
class TreeMap<K, V>
Here, K specifies the type of keys, and V specifies the type of values. The following TreeMap constructors are defined:
TreeMap()
TreeMap(Comparator<? super K> comp)
TreeMap(Map<? extends K, ? extends V> m)
TreeMap(SortedMap<K, ? extends V> sm)
The first form constructs an empty tree map that will be sorted by using the natural order of its keys. The second form constructs an empty tree-based map that will be sorted by using the Comparator comp. (Comparators are discussed later in this chapter.) The third form initializes a tree map with the entries from m, which will be sorted by using the natural order of the keys. The fourth form initializes a tree map with the entries from sm, which will be sorted in the same order as sm.
TreeMap has no map methods beyond those specified by the NavigableMap interface and the AbstractMap class.
The following program reworks the preceding example so that it uses TreeMap:
import java.util.*;
class TreeMapDemo
{
    public static void main(String args[])
    {
        // Create a tree map.
        TreeMap<String, Double> tm = new TreeMap<String, Double>();

        // Put elements to the map.
        tm.put("John Doe", 3434.34);
        tm.put("Tom Smith", 123.22);
        tm.put("Jane Baker", 1378.00);
        tm.put("Tod Hall", 99.22);
        tm.put("Ralph Smith", -19.08);

        // Get a set of the entries.
        Set<Map.Entry<String, Double>> set = tm.entrySet();

        // Display the elements.
        for (Map. Entry<String, Double> me: set)
        {
            System.out.print (me.getKey());
            System.out.println (me.getValue());
        }
        System.out.println();

        // Deposit 1000 into John Doe's account.
        double balance = tm.get ("John Doe");
        tm.put("John Doe", balance + 1000);

        System.out.println("John Doe's new balance: "+tm.get("John Doe"));
    }
}
The following is the output from this program:
John Doe: 3434.34
Ralph Smith: -19.08
Todd Hall: 99.22
Jane Baker: 1378.0
Tom Smith: 123.22
John Doe's current balance: 4434.34
Notice that TreeMap sorts the keys. However, in this case, they are sorted by first name instead of last name. You can alter this behavior by specifying a comparator when the map is created, as described shortly.
The LinkedHashMap Class
LinkedHashMap extends HashMap. It maintains a linked list of the entries in the map, in the order in which they were inserted. This allows insertion-order iteration over the map. That is, when iterating through a collection-view of a LinkedHashMap, the elements will be returned in the order in which they were inserted. You can also create a LinkedHashMap that returns its elements in the order in which they were last accessed. LinkedHashMap is a generic class that has this declaration:
class LinkedHashMap<K, V>
Here, K specifies the type of keys, and V specifies the type of values. LinkedHashMap defines the following constructors:
LinkedHashMap()
LinkedHashMap(Map<? extends K, ? extends V> m)
LinkedHashMap(int capacity)
LinkedHashMap(int capacity, float fillRatio)
LinkedHashMap(int capacity, float fillRatio, boolean Order)
The first form constructs a default LinkedHashMap. The second form initializes the LinkedHashMap with the elements from m. The third form initializes the capacity. The fourth form initializes both capacity and fill ratio. The meaning of capacity and fill ratio are the same as for HashMap. The default capacity is 16. The default ratio is 0.75. The last form allows you to specify whether the elements will be stored in the linked list by insertion order, or by order of last access. If Order is true, then access order is used. If Order is false, then insertion order is used.
LinkedHashMap adds only one method to those defined by HashMap. This method is removeEldestEntry(), and it is shown here:
protected boolean removeEldestEntry(Map.Entry<K, V> e)
This method is called by put() and putAll(). The oldest entry is passed in e. By default, this method returns false and does nothing. However, if you override this method, then you can have the LinkedHashMap remove the oldest entry in the map. To do this, have your override return true. To keep the oldest entry, return false.
The IdentityHashMap Class
IdentityHashMap extends AbstractMap and implements the Map interface. It is similar to HashMap except that it uses reference equality when comparing elements. IdentityHashMap is a generic class that has this declaration:
class IdentityHashMap<K, V>
Here, K specifies the type of key, and V specifies the type of value. The API documentation explicitly states that IdentityHashMap is not for general use.
The EnumMap Class
The EnumMap Class EnumMapextends AbstractMap and implements Map. It is specifically for use with keys of an enum type. It is a generic class that has this declaration:
class EnumMap<K extends Enum<K>, V>
Here, K specifies the type of key, and V specifies the type of value. Notice that K must extend Enum
EnumMap defines the following constructors:
EnumMap(Class<K> kType)
EnumMap(Map<K, ? extends V> m)
EnumMap(EnumMap<K, ? extends V> em)
The first constructor creates an empty EnumMap of type kType. The second creates an EnumMap map that contains the same entries as m. The third creates an EnumMap initialized with the values in em.
EnumMapdefines no methods of its own.
Comparator
EnumMap Both TreeSet and TreeMap store elements in sorted order. However, it is the comparator that defines precisely what “sorted order” means. By default, these classes store their elements by using what Java refers to as “natural ordering,” which is usually the ordering that you would expect (A before B, 1 before 2, and so forth). If you want to order elements a different way, then specify a Comparator when you construct the set or map. Doing so gives you the ability to govern precisely how elements are stored within sorted collections and maps.
comparator is a generic interface that has this declaration:
interface Comparator<T>
Here, T specifies the type of objects being compared. Prior to JDK 8, the Comparator interface defined only two methods:
compare() and equals(). The compare() method, shown here, compares two elements for order:
int compare(T _obj1_, T _obj2_)
obj1 and obj2 are the objects to be compared. Normally, this method returns zero if the objects are equal. It returns a positive value if obj1 is greater than obj2. Otherwise, a negative value is returned. The method can throw a ClassCastException if the types of the objects are not compatible for comparison. By implementing compare(), you can alter the way that objects are ordered. For example, to sort in reverse order, you can create a comparator that reverses the outcome of a comparison.
The equals() method, shown here, tests whether an object equals the invoking comparator: boolean equals(object obj)
Here, obj is the object to be tested for equality. The method returns true if obj and the invoking object are both Comparator objects and use the same ordering. Otherwise, it returns false. Overriding equals() is not necessary, and most simple comparators will not do so.
For many years, the preceding two methods were the only methods defined by Comparator. With the release of JDK 8, the situation dramatically changed. JDK 8 added significant new functionality to Comparator through the use of default and static interface methods. Each is described here.
You can obtain a comparator that reverses the ordering of the comparator on which it is called by using reversed(), shown here:
default Comparator<T> reversed()
It returns the reverse comparator. For example, assuming a comparator that uses natural ordering for the characters A through Z, a reverse order comparator would put B before A, C before B, and so on.
A method related to reversed() is reverseOrder(), shown next:
static <T extends Comparable<? super T>>
Comparator <T> reverseOrder()
It returns a comparator that reverses the natural order of the elements. Conversely, you can obtain a comparator that uses natural ordering by calling the static method naturalOrder(), shown next:
static <T extends Comparable<? super T>>
Comparator<T> naturalOrder()
If you want a comparator that can handle null values, use nullsFirst() or nullsLast(), shown here:
static <T>
Comparator<T>
nullsFirst(Comparator<? super T> comp)
static <T>
Comparator<T>
nullsLast(Comparator<? super T> comp)
The nullsFirst() method returns a comparator that views null values as less than other values. The nullsLast() method returns a comparator that views null values as greater than other values. In both cases, if the two values being compared are non-null, comp performs the comparison. If comp is passed null, then all non-null values are viewed as equivalent.
Another default method is thenComparing(). It returns a comparator that performs a second comparison when the outcome of the first comparison indicates that the objects being compared are equal. Thus, it can be used to create a “compare by X then compare by Y” sequence. For example, when comparing cities, the first comparison might compare names, with the second comparison comparing states. (Therefore, Springfield, Illinois, would come before Springfield, Missouri, assuming normal, alphabetical order.) The thenComparing() method has three forms. The first, shown here, lets you specify the second comparator by passing an instance of Comparator:
default Comparator<T>
then Comparing(Comparator<? super T> thenByComp)
Here, thenByComp specifies the comparator that is called if the first comparison returns equal.
The next versions of thenComparing() let you specify the standard functional interface Function (defined by java.util.function). They are shown here:
In both, getKey refers to function that obtains the next comparison key, which is used if the first comparison returns equal. In the second version, keyComp specifies the comparator used to compare keys. (Here, and in subsequent uses, U specifies the type of the key.)
Comparator also adds the following specialized versions of “then comparing” methods for the primitive types:
In all methods, getKey refers to a function that obtains the next comparison key.
Finally, Comparator has a method called comparing(). It returns a comparator that obtains its comparison key from a function passed to the method. There are two versions of comparing(), shown here:
In both, getKey refers to a function that obtains the next comparison key. In the second version, keyComp specifies the comparator used to compare keys. Comparator also adds the following specialized versions of these methods for the primitive types:
In all methods, getKey refers to a function that obtains the next comparison key.
Using a Comparator
The following is an example that demonstrates the power of a custom comparator. It implements the compare() method for strings that operates in reverse of normal. Thus, it causes a tree set to be sorted in reverse order.
// Use a custom comparator.
import java.util.*;
// A reverse comparator for strings.
class MyComp implements Comparator<String>
{
    public int compare (String aStr, String bStr)
    {
        // Reverse the comparison.
        return bStr.compareTo (aStr);
    }
    // No need to override equals or the default methods.
}
class CompDemo
{
    public static void main(String args[])
    {
        // Create a tree set.
        TreeSet<String> ts = new TreeSet<String> (new MyComp());

        // Add elements to the tree set.
        ts.add("C");
        ts.add("A");
        ts.add("B");
        ts.add("E");
        ts.add("F");
        ts.add("D");

        // Display the elements.
        for (String element : ts)
            System.out.print (element + " ");
        System.out.println();
    }
}
As the following output shows, the tree is now sorted in reverse order:
F E D C B A
Look closely at the MyComp class, which implements Comparator by implementing compare(). (As explained earlier, overriding equals() is neither necessary nor common. It is also not necessary to override the default methods.) Inside compare(), the String method compareTo() compares the two strings. However, bStr—not aStr—invokes compareTo(). This causes the outcome of the comparison to be reversed.
Although the way in which the reverse order comparator is implemented by the preceding program is perfectly adequate, there is another way to approach a solution. It is now possible to simply call reversed() on a natural-order comparator. It will return an equivalent comparator, except that it runs in reverse. For example, assuming the preceding program, you can rewrite MyComp as a natural-order comparator, as shown here:
class MyComp implements Comparator<String>
{
    public int compare (String aStr, String bStr)
    {
        return astr.compareTo (bStr);
    }
}
Next, you can use the following sequence to create a TreeSet that orders its string elements in reverse:
MyComp mc = new MyComp();       // Create a comparator

// Pass a reverse order version of MyComp to TreeSet.
TreeSet<String> ts = new TreeSet<String> (mc.reversed());
If you plug this new code into the preceding program, it will produce the same results as before. In this case, there is no advantage gained by using reversed(). However, in cases in which you need to create both a natural-order comparator and a reversed comparator, then using reversed() gives you an easy way to obtain the reverse-order comparator without having to code it explicitly.
It is not actually necessary to create the MyComp class in the preceding examples because a lambda expression can be easily used instead. For example, you can remove the MyComp class entirely and create the string comparator by using this statement:
// Use a lambda expression to implement Comparator<String>.

Comparator<String> mc = (aStr, bStr) -> aStr.compareTo(bStr);
One other point: in this simple example, it would also be possible to specify a reverse comparator via a lambda expression directly in the call to the TreeSet() constructor, as shown here:
// Pass a reversed comparator to TreeSet() via a
// lambda expression.
TreeSet<String> ts = new TreeSet<String>( (aStr, bStr) -> bStr.compareTo (aStr));
By making these changes, the program is substantially shortened, as its final version shown here illustrates:
// Use a lambda expression to create a reverse comparator.
import java.util.*;
class CompDemo2
{
    public static void main(String args[])
    {
        // Pass a reverse comparator to TreeSet() via a
        // lambda expression.
        TreeSet<String> ts = new TreeSet<String>((aStr, bStr) -> bStr.compareTo(aStr));

        // Add elements to the tree set.
        ts.add("C");
        ts.add("A");
        ts.add("B");
        ts.add("E");
        ts.add("F");
        ts.add("D");

        // Display the elements.
        for (String element : ts)
            System.out.print (element + " ");
        System.out.println();
    }
}
For a more practical example that uses a custom comparator, the following program is an updated version of the TreeMap program shown earlier that stores account balances. In the previous version, the accounts were sorted by name, but the sorting began with the first name. The following program sorts the accounts by last name. To do so, it uses a comparator that compares the last name of each account. This results in the map being sorted by last name.
// Use a comparator to sort accounts by last name.
import java.util.*;
// Compare last whole words in two strings.
class TComp implements Comparator<String>
{
    public int compare (String aStr, String bStr)
    {
        int i, j, k;
        // Find index of beginning of last name.
        i = aStr.lastIndexOf(' ');
        j = bStr.lastIndexOf(' ');

        k = aStr.substring (i).compareToIgnoreCase (bStr.substring(j));
        if (k==0) // last names match, check entire name
            return astr.compareToIgnoreCase (bStr);
        else
            return k;
    }
    // No need to override equals.
}
class TreeMapDemo2
{
    public static void main(String args[])
    {
        // Create a tree map.
        TreeMap<String, Double> tm = new TreeMap<String, Double> (new TComp());

        // Put elements to the map.
        tm.put("John Doe", 3434.34);
        tm.put("Tom Smith", 123.22);
        tm.put("Jane Baker", 1378.00);
        tm.put("Tod Hall", 99.22);
        tm.put("Ralph Smith", -19.08);

        // Get a set of the entries.
        Set<Map.Entry<String, Double>> set = tm.entrySet();

        // Display the elements.
        for (Map. Entry<String, Double> me : set)
        {
            System.out.print (me.getKey() + " : ");
            System.out.println (me.getValue());
        }
        System.out.println();

        // Deposit 1000 into John Doe's account.
        double balance = tm.get("John Doe");
        tm.put("John Doe", balance + 1000);
        System.out.println("John Doe's new balance: "+tm.get("John Doe"));
    }
}
Here is the output; notice that the accounts are now sorted by last name:
Jane Baker: 1378.0
John Doe: 3434.34
Todd Hall: 99.22
Ralph Smith: -19.08
Tom Smith: 123.22
John Doe's new balance: 4434.34
The comparator class TComp compares two strings that hold first and last names. It does so by first comparing last names. To do this, it finds the index of the last space in each string and then compares the substrings of each element that begin at that point. In cases where last names are equivalent, the first names are then compared. This yields a tree map that is sorted by last name, and within last name by first name. You can see this because Ralph Smith comes before Tom Smith in the output.
There is another way that you could code the preceding program so the map is sorted by last name and then by first name. This approach uses the thenComparing() method. Recall that thenComparing() lets you specify a second comparator that will be used if the invoking comparator returns equal. This approach is put into action by the following program, which reworks the preceding example to use thenComparing():
// Use thenComparing() to sort by last, then first name.
import java.util.*;
// A comparator that compares last names.
class CompLastNames implements Comparator<String>
{
    public int compare (String aStr, String bStr)
    {
        int i, j;
        // Find index of beginning of last name.
        i = aStr.lastIndexOf(' ');
        j = bStr.lastIndexOf(' ');

        return astr.substring (i).compareToIgnoreCase (bStr.substring(j));
    }
}

// Sort by entire name when last names are equal.
class CompThenByFirstName implements Comparator<String>
{
    public int compare (String aStr, String bStr)
    {
        int i, j;

        return astr.compareToIgnoreCase (bStr);
    }
}
class TreeMapDemo2A
{
    public static void main(String args[])
    {
        // Use thenComparing () to create a comparator that compares
        // last names, then compares entire name when last names match.
        CompLastNames compLN= new CompLastNames();
        Comparator<String> compLastThenFirst = compLN. thenComparing (new CompThenByFirstName());

        // Create a tree map.
        TreeMap<String,Double> tm = new TreeMap<String, Double> (compLast ThenFirst);

        // Put elements to the map.
        tm.put("John Doe", 3434.34);
        tm.put("Tom Smith", 123.22);
        tm.put("Jane Baker", 1378.00);
        tm.put("Tod Hall", 99.22);
        tm.put("Ralph Smith", -19.08);

        // Get a set of the entries.
        Set<Map.Entry<String, Double>> set = tm.entrySet();

        // Display the elements.
        for (Map. Entry<String, Double> me : set)
        {
            System.out.print (me.getKey() + ": ");
            System.out.println (me.getValue());
        }
        System.out.println();

        // Deposit 1000 into John Doe's account.
        double balance = tm.get("John Doe");
        tm.put("John Doe", balance + 1000);

        System.out.println("John Doe's new balance: "+tm.get("John Doe"));
    }
}
This version produces the same output as before. It differs only in how it accomplishes its job. To begin, notice that a comparator called CompLastNames is created. This comparator compares only the last names. A second comparator, called CompThenByFirstName, compares the entire name, starting with the first name. Next, the TreeMap is created by the following sequence:
Here, the primary comparator is compLN. It is an instance of CompLastNames. On it is called thenComparing(), passing in an instance of CompThenByFirstName. The result is assigned to the comparator called compLastThenFirst. This comparator is used to construct the TreeMap, as shown here:
TreeMap<String, Double> tm = new TreeMap<String, Double> (compLast ThenFirst);
Now, whenever the last names of the items being compared are equal, the entire name, beginning with the first name, is used to order the two. This means that names are ordered based on last name, and within last names, by first names.
One last point: in the interest of clarity, this example explicitly creates two comparator classes called CompLastNames and ThenByFirstNames, but lambda expressions could have been used instead. You might want to try this on your own. Just follow the same general approach described for the CompDemo2 example shown earlier.
The Collection Algorithms
The Collections Framework defines several algorithms that can be applied to collections and maps. These algorithms are defined as static methods within the Collections class. They are summarized in Table 19-15.
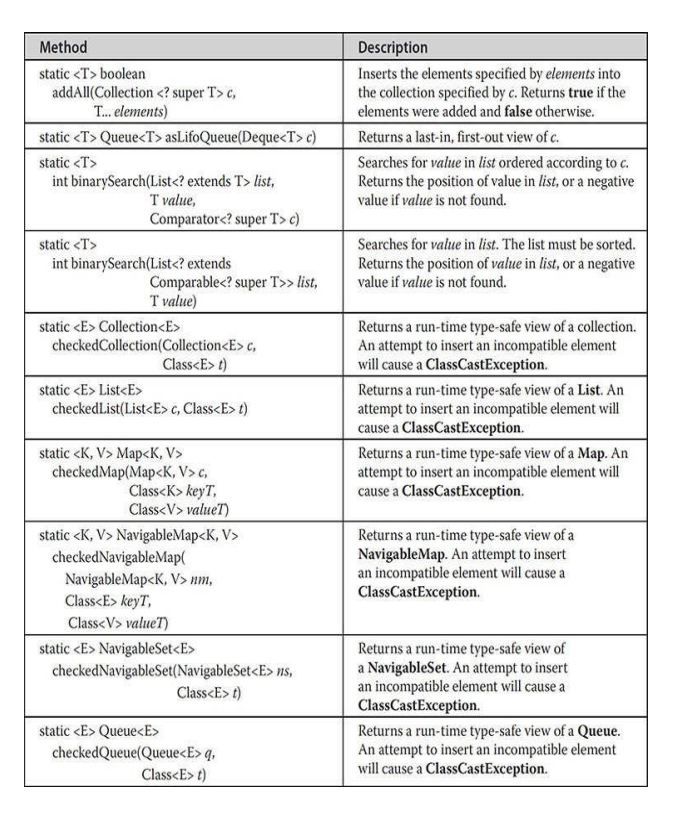
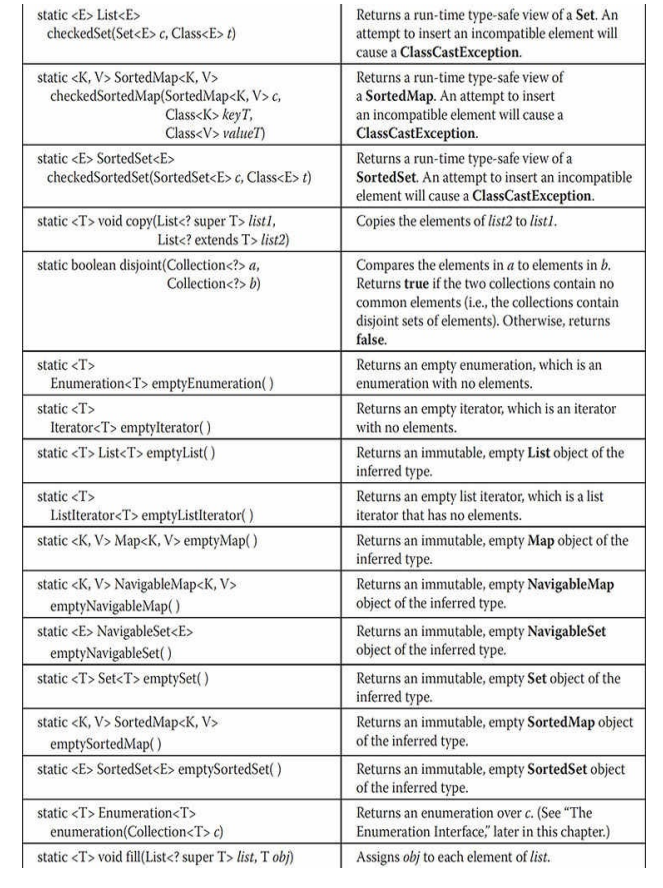
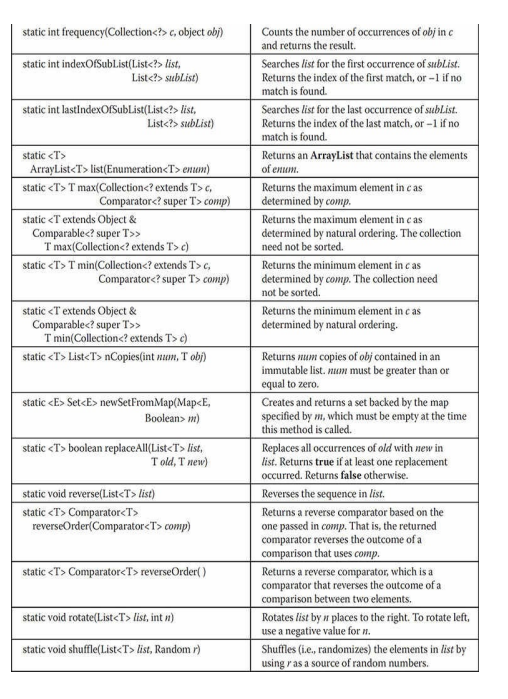
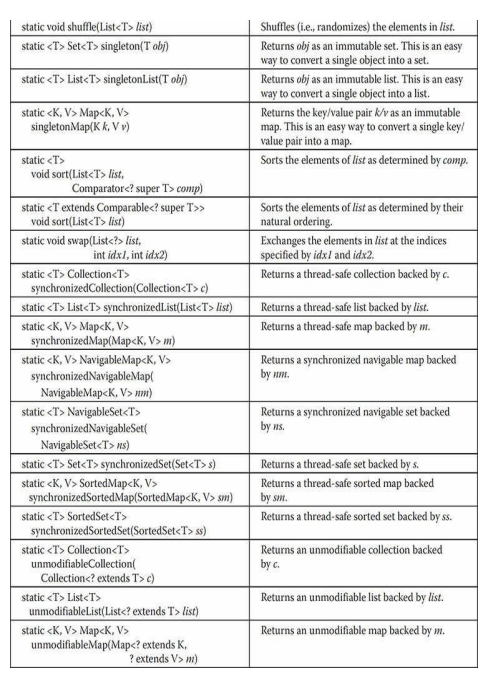
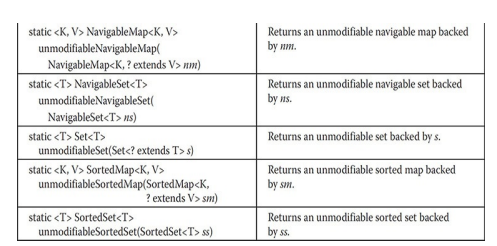
Table 19-15 The Algorithms Defined by Collections
Several of the methods can throw a ClassCastException, which occurs when an attempt is made to compare incompatible types, or an UnsupportedOperationException, which occurs when an attempt is made to modify an unmodifiable collection. Other exceptions are possible, depending on the method.
One thing to pay special attention to is the set of checked methods, such as checkedCollection(), which returns what the API documentation refers to as a “dynamically typesafe view” of a collection. This view is a reference to the collection that monitors insertions into the collection for type compatibility at run time. An attempt to insert an incompatible element will cause a ClassCastException. Using such a view is especially helpful during debugging because it ensures that the collection always contains valid elements. Related methods include checkedSet(), checkedList(), checkedMap(), and so on. They obtain a type-safe view for the indicated collection.
Notice that several methods, such as synchronizedList() and synchronizedSet(), are used to obtain synchronized (thread-safe) copies of the various collections. As a general rule, the standard collections implementations are not synchronized. You must use the synchronization algorithms to provide synchronization. One other point: iterators to synchronized collections must be used within synchronized blocks.
The set of methods that begins with unmodifiable returns views of the various collections that cannot be modified. These will be useful when you want to grant some process read—but not write—capabilities on a collection.
**Collections ** defines three static variables: EMPTY_SET, EMPTY_LIST, and EMPTY_MAP. All are immutable.
The following program demonstrates some of the algorithms. It creates and initializes a linked list. The reverseOrder() method returns a Comparator that reverses the comparison of Integer objects. The list elements are sorted according to this comparator and then are displayed. Next, the list is randomized by calling shuffle(), and then its minimum and maximum values are displayed.
// Demonstrate various algorithms.
import java.util.*;
class AlgorithmsDemo
{
    public static void main(String args[])
    {
        // Create and initialize linked list.
        LinkedList<Integer> 11 = new LinkedList<Integer>();
        11.add(-8);
        11.add(20);
        11.add(-20);
        11.add(8);

        // Create a reverse order comparator.
        Comparator<Integer> r = Collections.reverseOrder();

        // Sort list by using the comparator.
        Collections.sort (11, r);

        System.out.print ("List sorted in reverse: ");
        for (int i: 11)
            System.out.print (i+" ");
        System.out.println();

        // Shuffle list.
        Collections.shuffle (11);

        // Display randomized list.
        System.out.print ("List shuffled: ");
        for (int i: 11)
            System.out.print (i+" ");

        System.out.println();
        System.out.println("Minimum: "+ Collections.min(11));
        System.out.println("Maximum: " + Collections.max(11));
    }
}
Output from this program is shown here:
List sorted in reverse: 20 8 -8 -20

List shuffled: 20 -20 8 -8

Minimum: -20

Maximum: 20
Notice that min() and max() operate on the list after it has been shuffled. Neither requires a sorted list for its operation.
Arrays
The Arrays class provides various methods that are useful when working with arrays. These methods help bridge the gap between collections and arrays. Each method defined by Arrays is examined in this section.
The asList() method returns a List that is backed by a specified array. In other words, both the list and the array refer to the same location. It has the following signature:
static <T> List asList(T... array)
Here, array is the array that contains the data. The binarySearch() method uses a binary search to find a specified value.
This method must be applied to sorted arrays. Here are some of its forms. (Additional forms let you search a subrange):
static int binarySearch(byte array[ ], byte value)
static int binarySearch(char array[ ], char value)
static int binarySearch(double array[ ], double value)
static int binarySearch(float array[ ], float value)
static int binarySearch(int array[ ], int value)
static int binarySearch(long array[ ], long value)
static int binarySearch(short array[ ], short value)
static int binarySearch(Object array[ ], Object value)
static <T> int binarySearch(T[ ] array, T value, Comparator<? super T> c)
Here, array is the array to be searched, and value is the value to be located. The last two forms throw a ClassCastException if array contains elements that cannot be compared (for example, Double and StringBuffer) or if value is not compatible with the types in array. In the last form, the Comparator c is used to determine the order of the elements in array. In all cases, if value exists in array, the index of the element is returned. Otherwise, a negative value is returned.
The copyOf() method returns a copy of an array and has the following forms:
static boolean[ ] copyOf(boolean[ ] source, int len)
static byte[ ] copyOf(byte[ ] source, int len)
static char[ ] copyOf(char[ ] source, int len)
static double[ ] copyOf(double[ ] source, int len)
static float[ ] copyOf(float[ ] source, int len)
static int[ ] copyOf(int[ ] source, int len)
static long[ ] copyOf(long[ ] source, int len)
static short[ ] copyOf(short[ ] source, int len)
static <T> T[ ] copyOf(T[ ] source, int len)
static <T,U> T[ ] copyOf(U[ ] source, int len, Class<? extends T[ ]> resultT)
The original array is specified by source, and the length of the copy is specified by len. If the copy is longer than source, then the copy is padded with zeros (for numeric arrays), nulls (for object arrays), or false (for boolean arrays). If the copy is shorter than source, then the copy is truncated. In the last form, the type of resultT becomes the type of the array returned. If len is negative, a NegativeArraySizeException is thrown. If source is null, a NullPointerException is thrown. If resultT is incompatible with the type of source, an ArrayStoreException is thrown.
The copyOfRange() method returns a copy of a range within an array and has the following forms:
The original array is specified by source. The range to copy is specified by the indices passed via start and end. The range runs from start to end – 1. If the range is longer than source, then the copy is padded with zeros (for numeric arrays), nulls (for object arrays), or false (for boolean arrays). In the last form, the type of resultT becomes the type of the array returned. If start is negative or greater than the length of source, an ArrayIndexOutOfBoundsException is thrown. If start is greater than end, an IllegalArgumentException is thrown. If source is null, a NullPointerException is thrown. If resultT is incompatible with the type of source, an ArrayStoreException is thrown.
The equals() method returns true if two arrays are equivalent. Otherwise, it returns false. Here are a number of its forms. Several more versions are available that let you specify a range and/or a comparator.
static boolean equals(boolean _array1_[ ], boolean _array2_ [ ])
static boolean equals(byte _array1_[ ], byte _array2_ [ ])
static boolean equals(char _array1_[ ], char _array2_ [ ])
static boolean equals(double _array1_[ ], double _array2_ [ ])
static boolean equals(float _array1_[ ], float _array2_ [ ])
static boolean equals(int _array1_[ ], int _array2_ [ ])
static boolean equals(long _array1_[ ], long _array2_ [ ])
static boolean equals(short _array1_[ ], short _array2_ [ ])
static boolean equals(Object _array1_[ ], Object _array2_ [ ])
Here, array1 and array2 are the two arrays that are compared for equality. The deepEquals() method can be used to determine if two arrays, which might contain nested arrays, are equal. It has this declaration:
static boolean deepEquals(Object[ ] a, Object[ ] b)
It returns true if the arrays passed in a and b contain the same elements. If a and b contain nested arrays, then the contents of those nested arrays are also checked. It returns false if the arrays, or any nested arrays, differ.
The fill() method assigns a value to all elements in an array. In other words, it fills an array with a specified value. The fill() method has two versions. The first version, which has the following forms, fills an entire array:
static void fill(boolean array[ ], boolean value)
static void fill(byte array[ ], byte value)
static void fill(char array[ ], char value)
static void fill(double array[ ], double value)
static void fill(float array[ ], float value)
static void fill(int array[ ], int value)
static void fill(long array[ ], long value)
static void fill(short array[ ], short value)
static void fill(Object array[ ], Object value)
Here, value is assigned to all elements in array. The second version of the fill() method assigns a value to a subset of an array.
The sort() method sorts an array so that it is arranged in ascending order. The sort() method has two versions. The first version, shown here, sorts the entire array:
static void sort(byte array[ ])
static void sort(char array[ ])
static void sort(double array[ ])
static void sort(float array[ ])
static void sort(int array[ ])
static void sort(long array[ ])
static void sort(short array[ ])
static void sort(Object array[ ])
static <T> void sort(T array[ ], Comparator<? super T> c)
Here, array is the array to be sorted. In the last form, c is a Comparator that is used to order the elements of array. The last two forms can throw a ClassCastException if elements of the array being sorted are not comparable. The second version of sort() enables you to specify a range within an array that you want to sort.
One quite powerful method in Arrays is parallelSort() because it sorts, into ascending order, portions of an array in parallel and then merges the results. This approach can greatly speed up sorting times. Like sort(), there are two basic types of parallelSort(), each with several overloads. The first type sorts the entire array. It is shown here:
static void parallelSort(byte array[ ])
static void parallelSort(char array[ ])
static void parallelSort(double array[ ])
static void parallelSort(float array[ ])
static void parallelSort(int array[ ])
static void parallelSort(long array[ ])
static void parallelSort(short array[ ])
static <T extends Comparable<? super T>> void parallelSort(T array[ ])
static <T> void parallelSort(T array[ ], Comparator<? super T> c)
Here, array is the array to be sorted. In the last form, c is a comparator that is used to order the elements in the array. The last two forms can throw a ClassCastException if the elements of the array being sorted are not comparable. The second version of parallelSort() enables you to specify a range within the array that you want to sort.
Arrays supports spliterators by including the spliterator() method. It has two basic forms. The first type returns a spliterator to an entire array. It is shown here:
static Spliterator.OfDouble spliterator(double array[ ])
static Spliterator.OfInt spliterator(int array[ ])
static Spliterator.OfLong spliterator(long array[ ])
static <T> Spliterator spliterator(T array[ ])
Here, array is the array that the spliterator will cycle through. The second version of spliterator() enables you to specify a range to iterate within the array.
Arrays supports the Stream interface by including the stream() method. It has two forms. The first is shown here:
static DoubleStream stream(double array[ ])
static IntStream stream(int array[ ])
static LongStream stream(long array[ ])
static <T> Stream stream(T array[ ])
Here, array is the array to which the stream will refer. The second version of stream() enables you to specify a range within the array.
Another two methods are related: setAll() and parallelSetAll(). Both assign values to all of the elements, but parallelSetAll() works in parallel. Here is an example of each:
Several overloads exist for each of these that handle types int, long, and generic.
One of the more intriguing methods defined by Arrays is called parallelPrefix(), and it modifies an array so that each element contains the cumulative result of an operation applied to all previous elements. For example, if the operation is multiplication, then on return, the array elements will contain the values associated with the running product of the original values. It has several overloads. Here is one example:
static void parallelPrefix(double array[ ], DoubleBinaryOperator func)
Here, array is the array being acted upon, and func specifies the operation applied. (DoubleBinaryOperator is a functional interface defined in java.util.function.) Many other versions are provided, including those that operate on types int, long, and generic, and those that let you specify a range within the array on which to operate.
JDK 9 added three comparison methods to Arrays. They are compare(), compareUnsigned(), and mismatch(). Each has several overloads and each has versions that let you define a range to compare. Here is a brief description of each. The compare() method compares two arrays. It returns zero if they are the same, a positive value if the first array is greater than the second, and negative if the first array is less than the second. To perform an unsigned comparison of two arrays that hold integer values, use compareUnsigned(). To find the location of the first mismatch between two arrays, use mismatch(). It returns the index of the mismatch, or −1 if the arrays are equivalent.
Arrays also provides toString() and hashCode() for the various types of arrays. In addition, deepToString() and deepHashCode() are provided, which operate effectively on arrays that contain nested arrays.
The following program illustrates how to use some of the methods of the Arrays class:
// Demonstrate Arrays
import java.util.*;
class ArraysDemo
{
    public static void main(String args[])
    {
        // Allocate and initialize array.
        int array[] = new int[10];
        for (int i = 0; i < 10; i++)
            array[i]= -3 * i;

        // Display, sort, and display the array.
        System.out.print ("Original contents: ");
        display (array);
        Arrays.sort (array);
        System.out.print ("Sorted: ");
        display (array);

        // Fill and display the array.
        Arrays.fill (array, 2, 6, -1);
        System.out.print ("After fill(): ");
        display (array);

        // Sort and display the array.
        Arrays. sort (array);
        System.out.print ("After sorting again: ");
        display (array);

        // Binary search for -9.
        System.out.print ("The value 9 is at location ");
        int index=Arrays.binarySearch (array, -9);
        System.out.println (index);
    }

    static void display (int array[])
    {
        for (int i: array)
        System.out.print (i + " ");
        System.out.println();
    }
}
The following is the output from this program:
Original contents: 0 -3 -6 -9 -12 -15 -18 -21 -24 -27

Sorted: -27 -24 -21 -18 -15 -12 -9 -6 -3 0

After fill(): -27 -24 -1 -1 -1 -1 -9 -6 -3 0

After sorting again: -27 -24 -9 -6 -3 -1 -1 -1 -1 0

The value -9 is at location 2
The Legacy Classes and Interfaces
As explained at the start of this chapter, early versions of java.util did not include the Collections Framework. Instead, it defined several classes and an interface that provided an ad hoc method of storing objects. When collections were added (by J2SE 1.2), several of the original classes were reengineered to support the collection interfaces. Thus, they are now technically part of the Collections Framework. However, where a modern collection duplicates the functionality of a legacy class, you will usually want to use the newer collection class.
One other point: none of the modern collection classes described in this chapter are synchronized, but all the legacy classes are synchronized. This distinction may be important in some situations. Of course, you can easily synchronize collections by using one of the algorithms provided by Collections.
The legacy classes defined by java.util are shown here:

The Enumeration Interface
The Enumeration interface defines the methods by which you can enumerate (obtain one at a time) the elements in a collection of objects. This legacy interface has been superseded by Iterator. Although not deprecated, Enumeration is considered obsolete for new code. However, it is used by several methods defined by the legacy classes (such as Vector and Properties) and is used by several other API classes. It was retrofitted for generics by JDK 5. It has this declaration:
interface Enumeration<E>
where E specifies the type of element being enumerated. Enumeration specifies the following two abstract methods:
boolean hasMoreElements() E nextElement()
When implemented, hasMoreElements() must return true while there are still more elements to extract, and false when all the elements have been enumerated. nextElement() returns the next object in the enumeration. That is, each call to nextElement() obtains the next object in the enumeration. It throws NoSuchElementException when the enumeration is complete.
JDK 9 added a default method to Enumeration called asIterator(). It is shown here:
default Iterator<E> asIterator()
It returns an iterator to the elements in the enumeration. As such, it provides an easy way to convert an old-style Enumeration into a modern Iterator. Furthermore, if a portion of the elements in the enumeration have already been read prior to calling asIterator(), the returned iterator accesses only the remaining elements.
Vector
Vectorimplements a dynamic array. It is similar to ArrayList, but with two differences: Vector is synchronized, and it contains many legacy methods that duplicate the functionality of methods defined by the Collections Framework. With the advent of collections, Vector was reengineered to extend AbstractList and to implement the List interface. With the release of JDK 5, it was retrofitted for generics and reengineered to implement Iterable. This means that Vector is fully compatible with collections, and a Vector can have its contents iterated by the enhanced for loop.
Vector is declared like this:
class Vector<E>
Here, E specifies the type of element that will be stored. Here are the Vector constructors:
Vector()
Vector(int size)
Vector(int size, int incr)
Vector(Collection<? extends E> c)
The first form creates a default vector, which has an initial size of 10. The second form creates a vector whose initial capacity is specified by size. The third form creates a vector whose initial capacity is specified by size and whose increment is specified by incr. The increment specifies the number of elements to allocate each time that a vector is resized upward. The fourth form creates a vector that contains the elements of collection c.
All vectors start with an initial capacity. After this initial capacity is reached, the next time that you attempt to store an object in the vector, the vector automatically allocates space for that object plus extra room for additional objects. By allocating more than just the required memory, the vector reduces the number of allocations that must take place as the vector grows. This reduction is important, because allocations are costly in terms of time. The amount of extra space allocated during each reallocation is determined by the increment that you specify when you create the vector. If you don’t specify an increment, the vector’s size is doubled by each allocation cycle.
Vector defines these protected data members:
int capacityIncrement;
int elementCount;
Object[ ] elementData;
The increment value is stored in capacityIncrement. The number of elements currently in the vector is stored in elementCount. The array that holds the vector is stored in elementData. In addition to the collections methods specified by List, Vector defines
several legacy methods, which are summarized in Table 19-16.
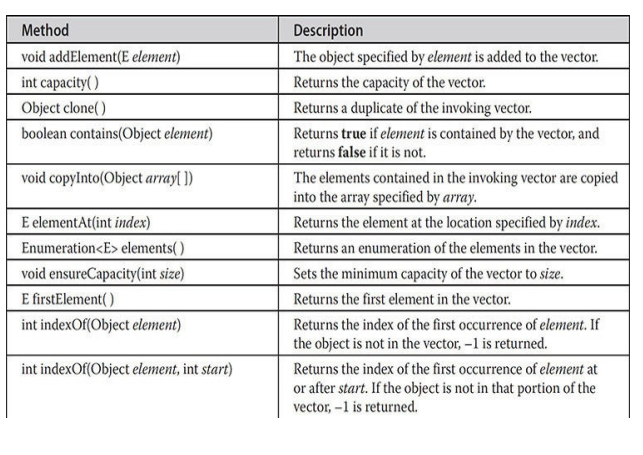
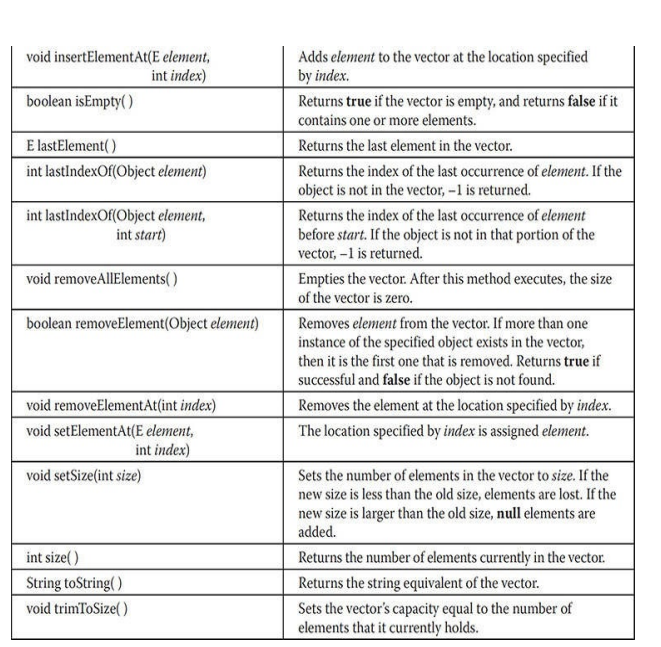
Because Vector implements List, you can use a vector just like you use an ArrayList instance. You can also manipulate one using its legacy methods. For example, after you instantiate a Vector, you can add an element to it by calling addElement(). To obtain the element at a specific location, call elementAt(). To obtain the first element in the vector, call firstElement(). To retrieve the last element, call lastElement(). You can obtain the index of an element by using indexOf() and lastIndexOf(). To remove an element, call removeElement() or removeElementAt().
The following program uses a vector to store various types of numeric objects. It demonstrates several of the legacy methods defined by Vector. It also demonstrates the Enumeration interface.
// Demonstrate various Vector operations.
import java.util.*;
class VectorDemo
{
    public static void main(String args[])
    {
        // initial size is 3, increment is 2
        Vector<Integer> v = new Vector<Integer> (3, 2);
        System.out.println("Initial size: " +V.size());
        System.out.println("Initial capacity: "+v.capacity());
        v.addElement(1);
        v.addElement (2);
        v.addElement (3);
        v.addElement (4);
        System.out.println("Capacity after four additions: " +

        v.capacity());
        v.addElement (5);
        System.out.println("Current capacity:"+v.capacity());

        v.addElement (6);
        v.addElement (7);
        System.out.println("Current capacity:"+v.capacity());

        v.addElement (9);
        v.addElement (10);
        System.out.println("Current capacity:"+v.capacity());

        v.addElement (11);
        v.addElement (12);
        System.out.println("First element: "+ v.firstElement());
        System.out.println("Last element: " + v.lastElement());

        if (v.contains(3))
            System.out.println("Vector contains 3.");

        // Enumerate the elements in the vector.
        Enumeration<Integer> vEnum = v.elements();
        System.out.println("\nElements in vector: ");
        while (vEnum.hasMoreElements())
            System.out.print (vEnum.nextElement() + " ");
        System.out.println();
    }
}
The output from this program is shown here:
Initial size: 0
Initial capacity: 3
Capacity after four additions: 5
Current capacity: 5
Current capacity: 7
Current capacity: 9
First element: 1
Last element: 12
Vector contains 3.
Elements in vector:
1 2 3 4 5 6 7 9 10 11 12
Instead of relying on an enumeration to cycle through the objects (as the preceding program does), you can use an iterator. For example, the following iterator-based code can be substituted into the program:
// Use an iterator to display contents.
Iterator<Integer> vitr = v.iterator();
System.out.println("\nElements in vector: ");
while (vItr.hasNext())
    System.out.print (vItr.next() + " ");
System.out.println();
You can also use a for-each for loop to cycle through a Vector, as the following version of the preceding code shows:
// Use an enhanced for loop to display contents
System.out.println("\nElements in vector: ");
for (int i : v)
    System.out.print(i + " ");
System.out.println();
Because the Enumeration interface is not recommended for new code, you will usually use an iterator or a for-each for loop to enumerate the contents of a vector. Of course, legacy code will employ Enumeration. Fortunately, enumerations and iterators work in nearly the same manner.
Stack
Stack is a subclass of Vector that implements a standard last-in, first-out stack. Stack only defines the default constructor, which creates an empty stack. With the release of JDK 5, Stack was retrofitted for generics and is declared as shown here:
class Stack<E>
Here, E specifies the type of element stored in the stack. Stack includes all the methods defined by Vector and adds several of its own, shown in Table 19-17.
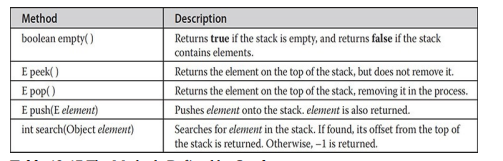
To put an object on the top of the stack, call push(). To remove and return the top element, call pop(). You can use peek() to return, but not remove, the top object. An EmptyStackException is thrown if you call pop() or peek() when the invoking stack is empty. The empty() method returns true if nothing is on the stack. The search() method determines whether an object exists on the stack and returns the number of pops that are required to bring it to the top of the stack. Here is an example that creates a stack, pushes several Integer objects onto it, and then pops them off again:
// Demonstrate the Stack class.
import java.util.*;
class StackDemo
{
    static void showpush (Stack<Integer> st, int a)
    {
        st.push(a);
        System.out.println("push(" + a + ")");
        System.out.println("stack: " + st);
    }

    static void showpop (Stack<Integer> st)
    {
        System.out.print ("pop ->");
        Integer a = st.pop();
        System.out.println(a);
        System.out.println("stack: " + st);
    }
    public static void main(String args[])
    {
        Stack<Integer> st = new Stack<Integer>();

        System.out.println("stack: " + st);
        showpush (st, 42);
        showpush (st, 66);
        showpush (st, 99);
        showpop (st);
        showpop (st);
        showpop (st);
        try
        {
            showpop (st);
        }
        catch (EmptyStackException e)
        {
            System.out.println("empty stack");
        }
    }
}
The following is the output produced by the program; notice how the exception handler for EmptyStackException is used so that you can gracefully handle a stack underflow:
stack: []
push (42)
stack: [42]
push (66)
stack: [42, 66]
push (99)
stack: [42, 66, 99]
pop-> 99
stack: [42, 66]
pop -> 66
stack: [42]
pop -> 42
stack: [ ]
pop -> empty stack
One other point: although Stack is not deprecated, ArrayDeque is a better choice.
Dictionary
Dictionary is an abstract class that represents a key/value storage repository and operates much like Map. Given a key and value, you can store the value in a Dictionary object. Once the value is stored, you can retrieve it by using its key. Thus, like a map, a dictionary can be thought of as a list of key/value pairs. Although not currently deprecated, Dictionary is classified as obsolete, because it is fully superseded by Map. However, Dictionary is still in use and thus is discussed here.
With the advent of JDK 5, Dictionary was made generic. It is declared as shown here:
class Dictionary<K, V>
Here, K specifies the type of keys, and V specifies the type of values. The abstract methods defined by Dictionary are listed in Table 19-18.
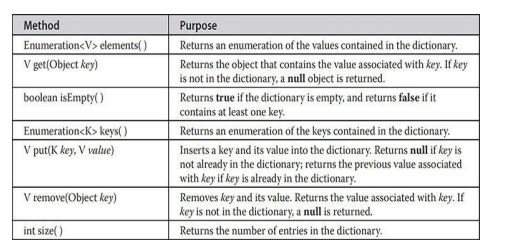
To add a key and a value, use the put() method. Use get() to retrieve the value of a given key. The keys and values can each be returned as an Enumeration by the keys() and elements() methods, respectively. The size() method returns the number of key/value pairs stored in a dictionary, and isEmpty() returns true when the dictionary is empty. You can use the remove() method to delete a key/value pair.
REMEMBER
The Dictionary class is obsolete. You should implement the Map interface to obtain key/value storage functionality.
Hashtable
Hashtable was part of the original java.util and is a concrete implementation of a Dictionary. However, with the advent of collections, Hashtable was reengineered to also implement the Map interface. Thus, Hashtable is integrated into the Collections Framework. It is similar to HashMap, but is synchronized.
Like HashMap, Hashtable stores key/value pairs in a hash table. However, neither keys nor values can be null. When using a Hashtable, you specify an object that is used as a key, and the value that you want linked to that key. The key is then hashed, and the resulting hash code is used as the index at which the value is stored within the table.
Hashtable was made generic by JDK 5. It is declared like this:
class Hashtable<K, V>
Here, K specifies the type of keys, and V specifies the type of values. A hash table can only store keys that override the hashCode() and equals() methods that are defined by Object. The hashCode() method must compute and return the hash code for the object. Of course, equals() compares two objects. Fortunately, many of Java’s built-in classes already implement the hashCode() method. For example, the most common type of Hashtable uses a String object as the key. String implements both hashCode() and equals().
The Hashtable constructors are shown here:
Hashtable()
Hashtable(int size)
Hashtable(int size, float fillRatio)
Hashtable(Map<? extends K, ? extends V> m)
The first version is the default constructor. The second version creates a hash table that has an initial size specified by size. (The default size is 11.) The third version creates a hash table that has an initial size specified by size and a fill ratio specified by fillRatio. This ratio (also referred to as a load factor) must be between 0.0 and 1.0, and it determines how full the hash table can be before it is resized upward. Specifically, when the number of elements is greater than the capacity of the hash table multiplied by its fill ratio, the hash table is expanded. If you do not specify a fill ratio, then 0.75 is used. Finally, the fourth version creates a hash table that is initialized with the elements in m. The default load factor of 0.75 is used.
In addition to the methods defined by the Map interface, which Hashtable now implements, Hashtable defines the legacy methods listed in Table 19-19. Several methods throw NullPointerException if an attempt is made to use a null key or value.
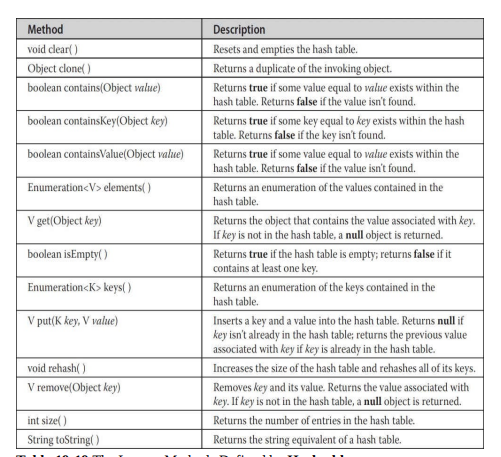
The following example reworks the bank account program, shown earlier, so that it uses a Hashtable to store the names of bank depositors and their current balances:
// Demonstrate a Hashtable.
import java.util.*;
class HTDemo
{
    public static void main(String args[])
    {
        Hashtable<String, Double> balance = new Hashtable<String, Double>();

        Enumeration<String> names;
        String str;
        double bal;

        balance.put("John Doe", 3434.34);
        balance.put("Tom Smith", 123.22);
        balance.put("Jane Baker", 1378.00);
        balance.put("Tod Hall", 99.22);
        balance.put("Ralph Smith", -19.08);

        // Show all balances in hashtable.
        names = balance.keys();
        while (names.hasMoreElements())
        {
            str = names.nextElement();
            System.out.println(str + ": " + balance.get(str));
        }

        System.out.println();

        // Deposit 1,000 into John Doe's account.
        bal = balance.get("John Doe");
        balance.put("John Doe", bal+1000);
        System.out.println("John Doe's new balance: "+balance.get("John Doe"));
    }
}
The output from this program is shown here:
Todd Hall: 99.22
Ralph Smith: -19.08
John Doe: 3434.34
Jane Baker: 1378.0
Tom Smith: 123.22
John Doe's new balance: 4434.34
One important point: Like the map classes, Hashtable does not directly support iterators. Thus, the preceding program uses an enumeration to display the contents of balance. However, you can obtain set-views of the hash table, which permits the use of iterators. To do so, you simply use one of the collection-view methods defined by Map, such as entrySet() or keySet(). For example, you can obtain a set-view of the keys and cycle through them using either an iterator or an enhanced for loop. Here is a reworked version of the program that shows this technique:
// Use iterators with a Hashtable.
import java.util.*;
class HTDemo2
{
    public static void main(String args[])
    {
        Hashtable<String, Double> balance = new Hashtable<String, Double>();
        String str;
        double bal;

        balance.put("John Doe", 3434.34);
        balance.put("Tom Smith", 123.22);
        balance.put("Jane Baker", 1378.00);
        balance.put("Tod Hall", 99.22);
        balance.put("Ralph Smith", -19.08);

        // Show all balances in hashtable.
        // First, get a set view of the keys.
        Set<String> set = balance.keySet();

        // Get an iterator.
        Iterator<String> itr = set.iterator();
        while (itr.hasNext())
        {
            str = itr.next();
            System.out.println(str + ": " + balance.get(str));
        }

        System.out.println();
        // Deposit 1,000 into John Doe's account.

        bal = balance.get("John Doe");
        balance.put("John Doe", bal+1000);
        System.out.println("John Doe's new balance: " + balance.get("John Doe"));
    }
}
Properties
Properties is a subclass of Hashtable. It is used to maintain lists of values in which the key is a String and the value is also a String. The Properties class is used by some other Java classes. For example, it is the type of object returned by System.getProperties() when obtaining environmental values. Although the Properties class, itself, is not generic, several of its methods are.
Properties defines the following protected volatile instance variable:
Properties defaults;
This variable holds a default property list associated with a Properties object.
Properties defines these constructors:
Properties()
Properties(Properties propDefault)
Properties(int capacity)
The first version creates a Properties object that has no default values. The second creates an object that uses propDefault for its default values. In both cases, the property list is empty. The third constructor lets you specify an initial capacity for the property list. In all cases, the list will grow as needed.
In addition to the methods that Properties inherits from Hashtable, Properties defines the methods listed in Table 19-20. Properties also contains one deprecated method: save(). This was replaced by store() because save() did not handle errors correctly.
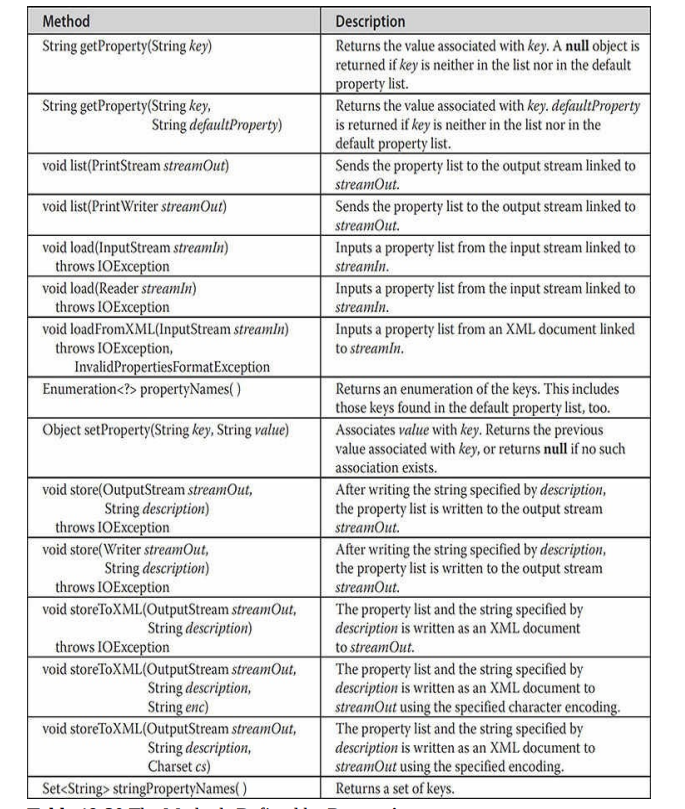
One useful capability of the Properties class is that you can specify a default property that will be returned if no value is associated with a certain key. For example, a default value can be specified along with the key in the getProperty() method—such as getProperty (“name” ,“default value”). If the “name” value is not found, then “default value” is returned. When you construct a Properties object, you can pass another instance of Properties to be used as the default properties for the new instance. In this case, if you call getProperty(“foo”) on a given Properties object, and “foo” does not exist, Java looks for “foo” in the default Properties object. This allows for arbitrary nesting of levels of default properties.
The following example demonstrates Properties. It creates a property list in which the keys are the names of states and the values are the names of their capitals. Notice that the attempt to find the capital for Florida includes a default value.
// Demonstrate a Property list.
import java.util.*;
class PropDemo
{
    public static void main(String args[])
    {
        Properties capitals = new Properties();

        capitals.setProperty("Illinois", "Springfield");
        capitals.setProperty("Missouri", "Jefferson City");
        capitals.setProperty("Washington", "Olympia");
        capitals.setProperty("California", "Sacramento");
        capitals.setProperty("Indiana", "Indianapolis");

        // Get a set-view of the keys.
        Set<?> states = capitals.keySet();

        // Show all of the states and capitals.
        for (Object name : states)
        System.out.println("The capital of "+ name+" is " + capitals.getProperty((String) name) + ".");
        System.out.println();

        // Look for state not in list specify default. --
        String str = capitals.getProperty("Florida", "Not Found");
        System.out.println("The capital of Florida is " + str + ".");
    }
}
The output from this program is shown here:
The capital of Missouri is Jefferson City.
The capital of Illinois is Springfield.
The capital of Indiana is Indianapolis.
The capital of California is Sacramento.
The capital of Washington is Olympia.
The capital of Florida is Not Found.
Since Florida is not in the list, the default value is used. Although it is perfectly valid to use a default value when you call
getProperty(), as the preceding example shows, there is a better way of handling default values for most applications of property lists. For greater flexibility, specify a default property list when constructing a Properties object. The default list will be searched if the desired key is not found in the main list. For example, the following is a slightly reworked version of the preceding program, with a default list of states specified. Now, when Florida is sought, it will be found in the default list:
// Use a default property list.
import java.util.*;
class PropDemoDef
{
    public static void main(String args[])
    {
        Properties defList = new Properties();
        defList.setProperty("Florida", "Tallahassee");
        defList.setProperty("Wisconsin", "Madison");

        Properties capitals = new Properties (defList);
        capitals.setProperty("Illinois", "Springfield");
        capitals.setProperty("Missouri", "Jefferson City");
        capitals.setProperty("Washington", "Olympia");
        capitals.setProperty("California", "Sacramento");
        capitals.setProperty("Indiana", "Indianapolis");

        // Get a set-view of the keys.
        Set<?> states = capitals.keySet();

        // Show all of the states and capitals.
        for (Object name : states)
        System.out.println("The capital of " +name + " is " + capitals.getProperty((String) name) + ".");
        System.out.println();

        // Florida will now be found in the default list.
        String str = capitals.getProperty("Florida");
        System.out.println("The capital of Florida is "+ str + ".");
    }
}
Using store() and load()
One of the most useful aspects of Properties is that the information contained in a Properties object can be easily stored to or loaded from disk with the store() and load() methods. At any time, you can write a Properties object to a stream or read it back. This makes property lists especially convenient for implementing simple databases. For example, the following program uses a property list to create a simple computerized telephone book that stores names and phone numbers. To find a person’s number, you enter his or her name. The program uses the store() and load() methods to store and retrieve the list. When the program executes, it first tries to load the list from a file called phonebook.dat. If this file exists, the list is loaded. You can then add to the list. If you do, the new list is saved when you terminate the program. Notice how little code is required to implement a small, but functional, computerized phone book.
/*
A simple telephone number database that uses
a property list.
*/
import java.io.*;
import java.util.*;

class Phonebook
{
    public static void main(String args[]) throws IOException
    {
        Properties ht = new Properties();
        BufferedReader br = new BufferedReader (new InputStreamReader(System.in));
        String name, number;
        FileInputStream fin = null;
        boolean changed = false;

        // Try to open phonebook.dat file.
        try
        {
            fin = new FileInputStream("phonebook.dat");
        }
        catch (FileNotFoundException e)
        {
            // ignore missing file.
        }
        /*
        If phonebook file already exists, load existing telephone numbers.
        */
        try
        {
            if(fin != null)
            {
                ht.load(fin);
                fin.close();
            }
        }
        catch (IOException e)
        {
            System.out.println("Error reading file.");
        }
        // Let user enter new names and numbers.
        do
        {
            System.out.println("Enter new name" + " ('quit' to stop)+" : ");
            name = br.readLine();
            if (name.equals("quit"))
                continue;
            System.out.println("Enter number: ");
            number = br.readLine();

            ht.setProperty (name, number);
            changed = true;
        }while (!name.equals("quit"));

        // If phone book data has changed, save it.
        if (changed)
        {
            FileOutputStream fout = new FileOutputStream("phonebook.dat");
            ht.store (fout, "Telephone Book");
            fout.close();
        }
        // Look up numbers given a name.
        do
        {
            System.out.println("Enter name to find" +"('quit' to quit): ");
            name = br.readLine();
            if (name.equals("quit"))
            continue;
            number= (String) ht.get(name);
            System.out.println(number);
        }while (Iname.equals("quit"));
    }
}
Parting Thoughts on Collections
The Collections Framework gives you, the programmer, a powerful set of well- engineered solutions to some of programming’s most common tasks. Consider using a collection the next time you need to store and retrieve information. Remember, collections need not be reserved for only the “large jobs,” such as corporate databases, mailing lists, or inventory systems. They are also effective when applied to smaller jobs. For example, a TreeMap might make an excellent collection to hold the directory structure of a set of files. A TreeSet could be quite useful for storing project-management information. Frankly, the types of problems that will benefit from a collections-based solution are limited only by your imagination. One last point: In Chapter 29, the stream API is discussed. Because streams are integrated with collections, consider using a stream when operating on a collection.