Exploring NIO
Beginning with version 1.4, Java has provided a second I/O system called NIO _(_which is short for New I/O). It supports a buffer-oriented, channel-based approach to I/O operations. With the release of JDK 7, the NIO system was greatly expanded, providing enhanced support for file-handling and file system features. In fact, so significant were the changes that the term NIO.2 is often used. Because of the capabilities supported by the NIO file classes, NIO is expected to become an increasingly important approach to file handling. This chapter explores several of the key features of the NIO system.
The NIO Classes
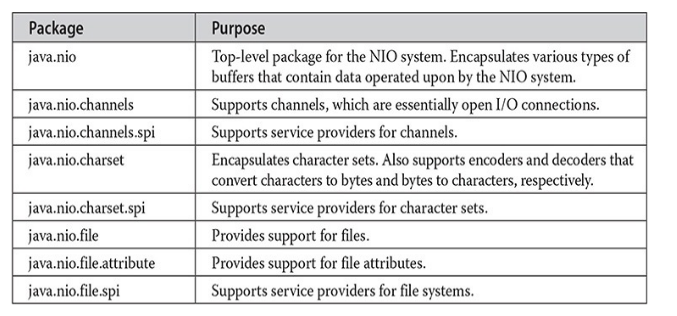
The NIO classes are contained in the packages shown here. Beginning with JDK 9, all are in the java.base module.
NOTE
This chapter assumes that you have read the overview of I/O given in Chapter 13 and the discussion of stream-based I/O supplied in Chapter 21.
NIO Fundamentals
The NIO system is built on two foundational items: buffers and channels. A buffer holds data. A channel represents an open connection to an I/O device, such as a file or a socket. In general, to use the NIO system, you obtain a channel to an I/O device and a buffer to hold data. You then operate on the buffer, inputting or outputting data as needed. The following sections examine buffers and channels in more detail.
Buffers
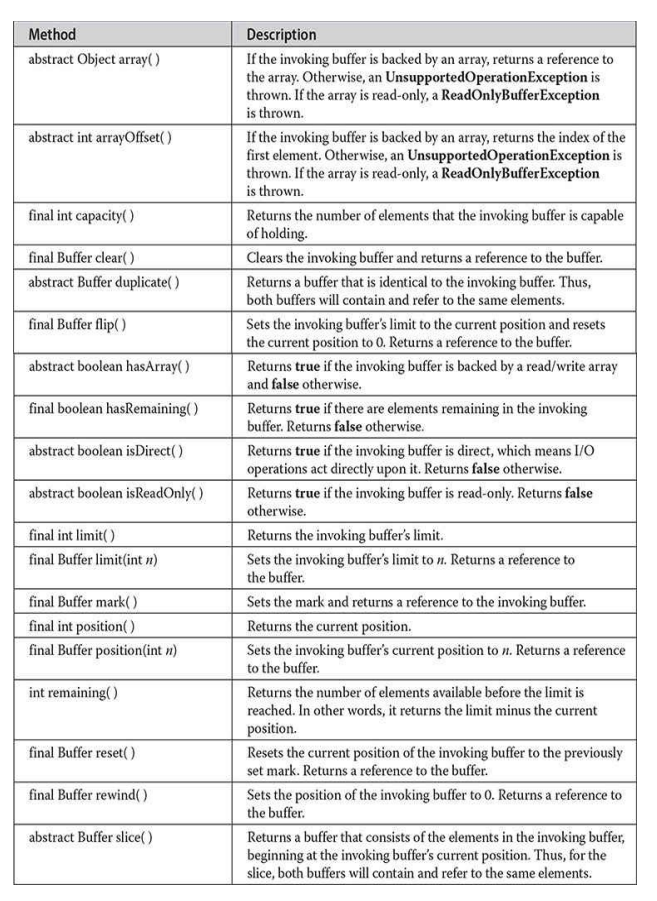
Buffers are defined in the java.nio package. All buffers are subclasses of the Buffer class, which defines the core functionality common to all buffers: current position, limit, and capacity. The current position is the index within the buffer at which the next read or write operation will take place. The current position is advanced by most read or write operations. The limit is the index value one past the last valid location in the buffer. The capacity is the number of elements that the buffer can hold. Often the limit equals the capacity of the buffer. Buffer also supports mark and reset. Buffer defines several methods, which are shown in Table 22-1.
From Buffer, the following specific buffer classes are derived, which hold the type of data that their names imply:

MappedByteBufferis a subclass of ByteBuffer and is used to map a file to a buffer.
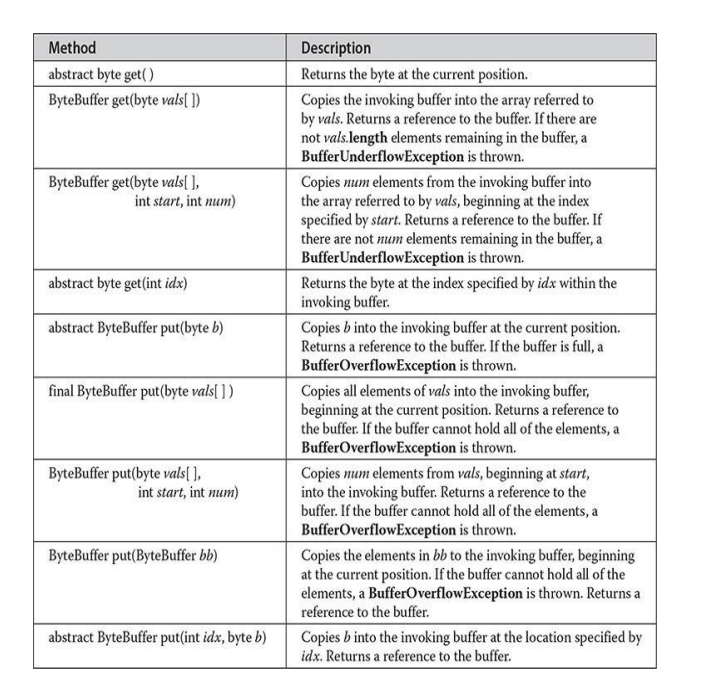
All of the aforementioned buffers provide various get() and put() methods, which allow you to get data from a buffer or put data into a buffer. (Of course, if a buffer is read-only, then put() operations are not available.) Table 22-2 shows the get() and put() methods defined by ByteBuffer. The other buffer classes have similar methods. All buffer classes also support methods that perform various buffer operations. For example, you can allocate a buffer manually using allocate(). You can wrap an array inside a buffer using wrap(). You can create a subsequence of a buffer using slice().
Channels
Channels are defined in java.nio.channels. A channel represents an open connection to an I/O source or destination. Channels implement the Channel interface. It extends Closeable, and it extends AutoCloseable. By implementing AutoCloseable, channels can be managed with a try-with- resources statement. When used in a try-with-resources block, a channel is closed automatically when it is no longer needed. (See Chapter 13 for a discussion of try-with-resources.) One way to obtain a channel is by calling getChannel() on an object that supports channels. For example, getChannel() is supported by the following I/O classes:

Another way to obtain a channel is to use one of the static methods defined by the Files class. For example, using Files, you can obtain a byte channel by calling newByteChannel(). It returns a SeekableByteChannel, which is an interface implemented by FileChannel. (The Files class is examined in detail later in this chapter.)
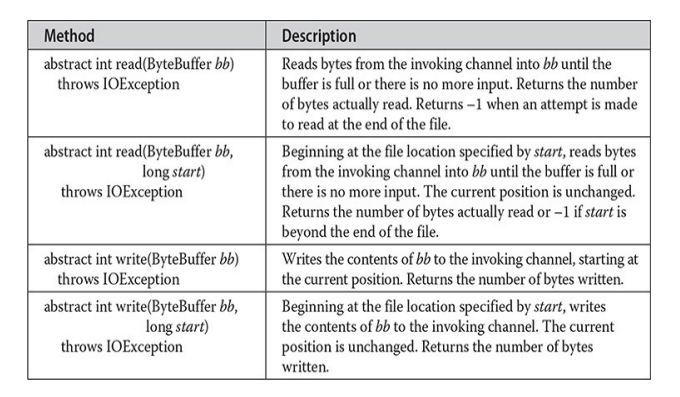
Channels such as FileChannel and SocketChannel support various read() and write() methods that enable you to perform I/O operations through the channel. For example, here are a few of the read() and write() methods defined for FileChannel:
Charsets and Selectors
Two other entities used by NIO are charsets and selectors. A charset defines the way that bytes are mapped to characters. You can encode a sequence of characters into bytes using an encoder. You can decode a sequence of bytes into characters using a decoder. Charsets, encoders, and decoders are supported by classes defined in the java.nio.charset package. Because default encoders and decoders are provided, you will not often need to work explicitly with charsets.
A selector supports key-based, non-blocking, multiplexed I/O. In other words, selectors enable you to perform I/O through multiple channels. Selectors are supported by classes defined in the java.nio.channels package. Selectors are most applicable to socket-backed channels.
We will not use charsets or selectors in this chapter, but you might find them useful in your own applications.
them useful in your own applications.
Enhancements Added by NIO.2
Beginning with JDK 7, the NIO system was substantially expanded and enhanced. In addition to support for the try-with-resources statement (which provides automatic resource management), the improvements included three new packages (java.nio.file, java.nio.file.attribute, and java.nio.file.spi); several new classes, interfaces, and methods; and direct support for stream- based I/O. The additions have greatly expanded the ways in which NIO can be used, especially with files. Several of the key additions are described in the following sections.
The Path Interface
Perhaps the single most important addition to the NIO system was the Path interface because it encapsulates a path to a file. As you will see, Path is the glue that binds together many of the NIO.2 file-based features. It describes a file’s location within the directory structure. Path is packaged in java.nio.file, and it inherits the following interfaces: Watchable, Iterable
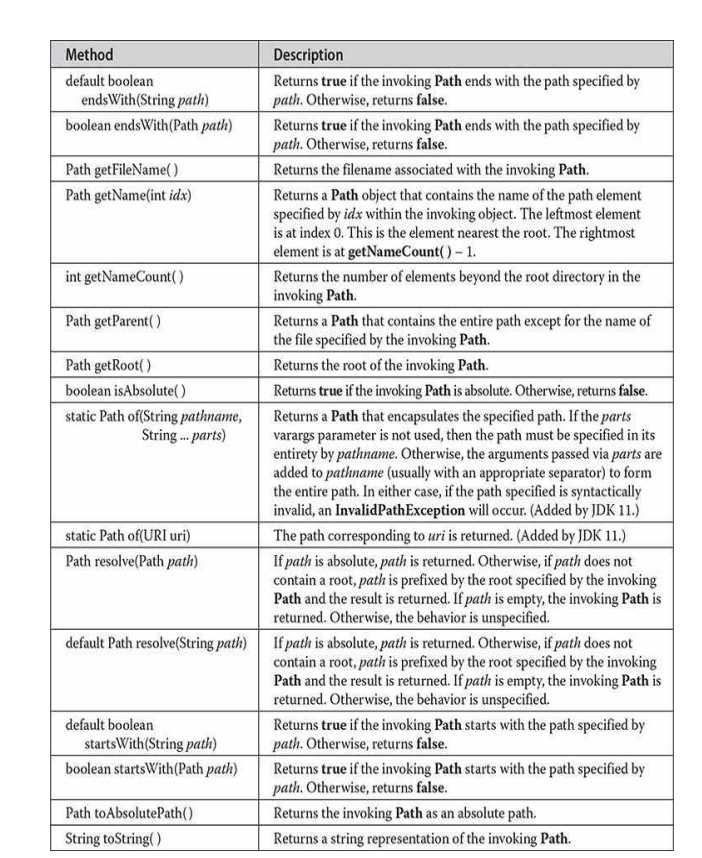
Path declares a number of methods that operate on the path. A sampling is shown in Table 22-3. Pay special attention to the getName() method. It is used to obtain an element in a path. It works using an index. At index zero is the part of the path nearest the root, which is the leftmost element in a path. Subsequent indexes specify elements to the right of the root. The number of elements in a path can be obtained by calling getNameCount(). If you want to obtain a string representation of the entire path, simply call toString(). Notice that you can resolve a relative path into an absolute path by using the resolve() method.
Beginning with JDK 11, an important new static factory method called of() was added to Path. It returns a Path instance from either a path name or a URI. Thus, of() gives you a way to construct a new Path instance.
One other point: When updating legacy code that uses the File class defined by java.io, it is possible to convert a File instance into a Path instance by calling toPath() on the File object. Furthermore, it is possible to obtain a File instance by calling the toFile() method defined by Path.
The Files Class
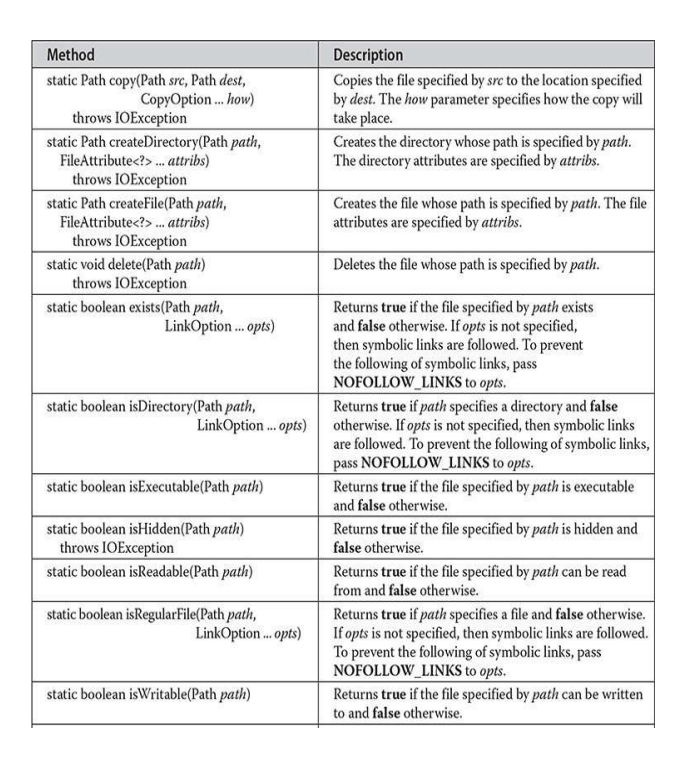
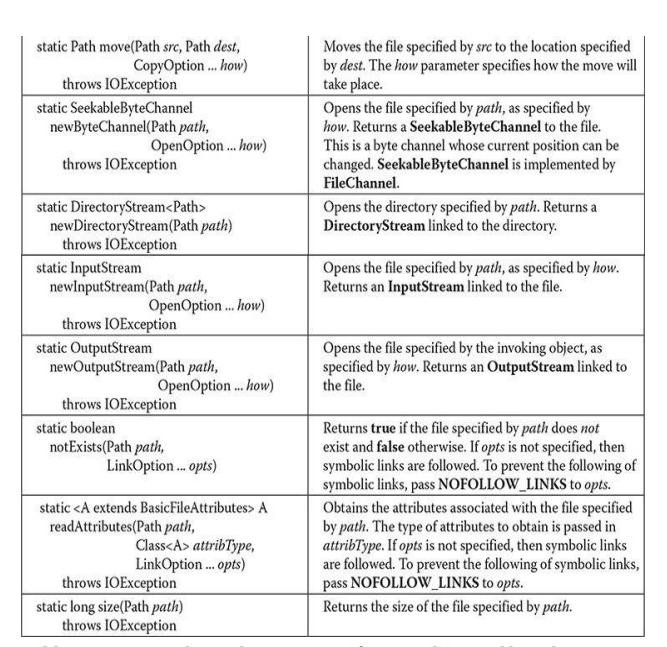
Many of the actions that you perform on a file are provided by static methods within the Files class. The file to be acted upon is specified by its Path. Thus, the Files methods use a Path to specify the file that is being operated upon. Files contains a wide array of functionality. For example, it has methods that let you open or create a file that has the specified path. You can obtain information about a Path, such as whether it is executable, hidden, or read- only. Files also supplies methods that let you copy or move files. A sampling is shown in Table 22-4. In addition to IOException, several other exceptions are possible. Files also includes these four methods: list(), walk(), lines(), and find(). All return a Stream object. These methods help integrate NIO with the stream API described in Chapter 29. Beginning with JDK 11, Files also includes the methods readString() and writeString(), which returns a String containing the characters in a file or writes a CharSequence (such as a String) to a file.
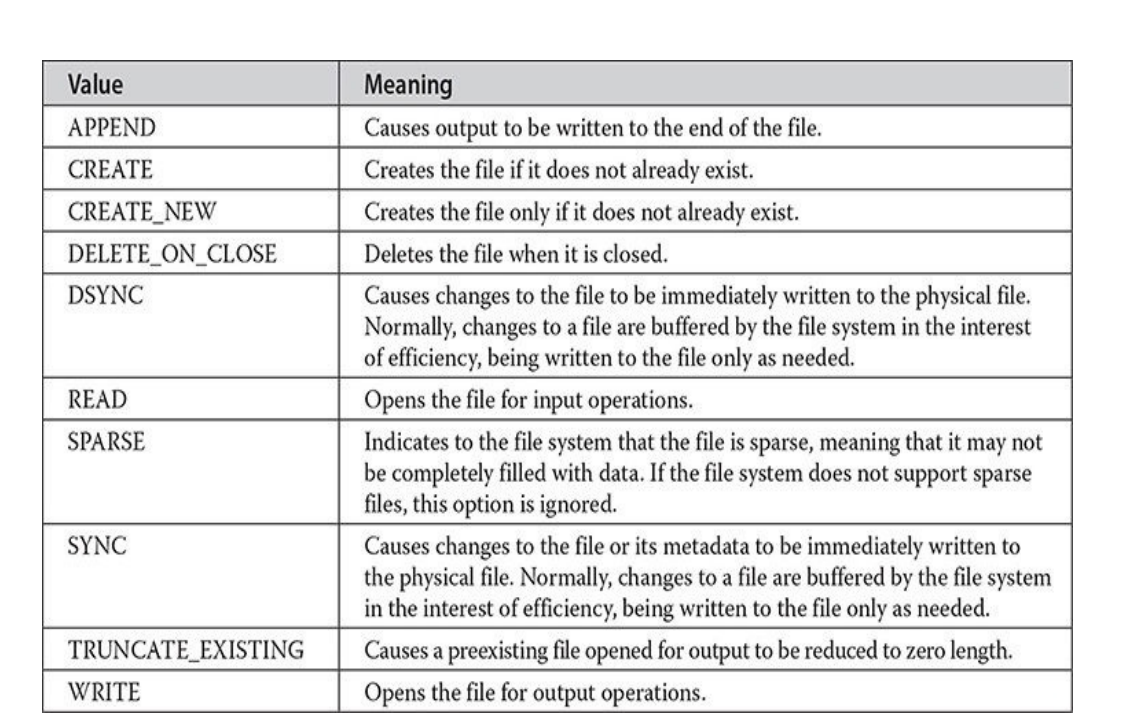
Notice that several of the methods in Table 22-4 take an argument of type OpenOption. This is an interface that describes how to open a file. It is implemented by the StandardOpenOption class, which defines an enumeration that has the values shown in Table 22-5.
The Paths Class
Because Path is an interface, not a class, you can’t create an instance of Path directly through the use of a constructor. Instead, you obtain a Path by a calling a method that returns one. Prior to JDK 11, you would typically do this by using the get() method defined by the Paths class. There are two forms of get(). The first is shown here:
static Path get(String pathname, String ... parts)
It returns a Path that encapsulates the specified path. The path can be specified in two ways. First, if parts is not used, then the path must be specified in its entirety by pathname. Alternatively, you can pass the path in pieces, with the first part passed in pathname and the subsequent elements specified by the parts varargs parameter. In either case, if the path specified is syntactically invalid, get() will throw an InvalidPathException.
The second form of get() creates a Path from a URI. It is shown here:
static Path get(URI uri)
The Path corresponding to uri is returned.
Although the Paths.get() method just described has been in use since JDK 7 and, at the time of this writing, is still available for use, it is no longer recommended. Instead, the Java API documentation for JDK 11 recommends the use of the new Path.of() method, which was added by JDK 11. Because of this, Path.of() is now the preferred approach. Of course, if you are using a compiler that predates JDK 11, then you must continue to use Paths.get().
It is important to understand that obtaining a Path to a file does not open or create a file. It simply creates an object that encapsulates the file’s directory path.
The File Attribute Interfaces
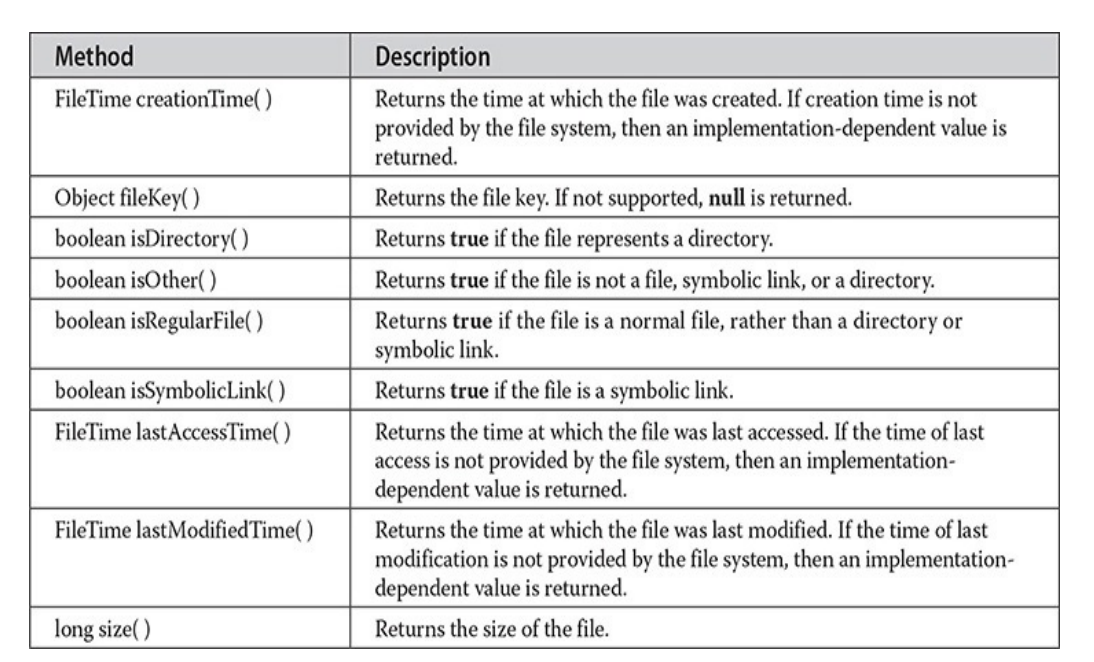
Associated with a file is a set of attributes. These attributes include such things as the file’s time of creation, the time of its last modification, whether the file is a directory, and its size. NIO organizes file attributes into several different interfaces. Attributes are represented by a hierarchy of interfaces defined in java.nio.file.attribute. At the top is BasicFileAttributes. It encapsulates the set of attributes that are commonly found in a variety of file systems. The methods defined by BasicFileAttributes are shown in Table 22-6.
From BasicFileAttributes two interfaces are derived: DosFileAttributes and PosixFileAttributes. DosFileAttributes describes those attributes related to the FAT file system as first defined by DOS. It defines the methods shown here:


static <A extends BasicFileAttributes>
A readAttributes(Path path, Class<A> attrType, LinkOption... opts)
throws IOException
This method returns a reference to an object that specifies the attributes associated with the file passed in path. The specific type of attributes is specified as a Class object in the attrType parameter. For example, to obtain the basic file attributes, pass BasicFileAttributes.class to attrType. For DOS attributes, use DosFileAttributes.class, and for POSIX attributes, use PosixFileAttributes.class. Optional link options are passed via opts. If not specified, symbolic links are followed. The method returns a reference to requested attributes. If the requested attribute type is not available, UnsupportedOperationException is thrown. Using the object returned, you can access the file’s attributes.
A second way to gain access to a file’s attributes is to call getFileAttributeView() defined by Files. NIO defines several attribute view interfaces, including AttributeView, BasicFileAttributeView, DosFileAttributeView, and PosixFileAttributeView, among others. Although we won’t be using attribute views in this chapter, they are a feature that you may find helpful in some situations.
In some cases, you won’t need to use the file attribute interfaces directly because the Files class offers static convenience methods that access several of the attributes. For example, Files includes methods such as isHidden() and isWritable().
It is important to understand that not all file systems support all possible attributes. For example, the DOS file attributes apply to the older FAT file system as first defined by DOS. The attributes that will apply to a wide variety of file systems are described by BasicFileAttributes. For this reason, these attributes are used in the examples in this chapter.
The FileSystem, FileSystems, and FileStore Classes
You can easily access the file system through the FileSystem and FileSystems classes packaged in java.nio.file. In fact, by using the newFileSystem() method defined by FileSystems, it is even possible to obtain a new file system. The FileStore class encapsulates the file storage system. Although these classes are not used directly in this chapter, you may find them helpful in your own applications.
Using the NIO System
This section illustrates how to apply the NIO system to a variety of tasks. Before beginning, it is important to emphasize that beginning with JDK 7, the NIO subsystem was greatly expanded. As a result, its uses have also been greatly expanded. As mentioned, the enhanced version is sometimes referred to as NIO.2. Because the features added by NIO.2 are so substantial, they have changed the way that much NIO-based code is written and have increased the types of tasks to which NIO can be applied. Because of its importance, the remaining discussion and examples in this chapter utilize NIO.2 features and, therefore, require a modern version of Java.
In the past, the primary purpose of NIO was channel-based I/O, and this is still a very important use. However, you can now use NIO for stream-based I/O and for performing file-system operations. As a result, the discussion of using and for performing file-system operations. As a result, the discussion of using NIO is divided into three parts:
- Using NIO for channel-based I/O
- Using NIO for stream-based I/O
- Using NIO for path and file system operations
Because the most common I/O device is the disk file, the rest of this chapter uses disk files in the examples. Because all file channel operations are byte- based, the type of buffers that we will be using are of type ByteBuffer.
Before you can open a file for access via the NIO system, you must obtain a Path that describes the file. In the past, one way to do this was to call the Paths.get() factory method, which has been available since JDK 7. However, as explained earlier, beginning with JDK 11, the preferred approach is to use Path.of() rather than Paths.get(). Because of this, the examples use Path.of(). If you are using a version of Java prior to JDK 11, simply substitute Paths.get() for Path.of() in the programs. The form of of() used in the examples is shown here:
static Path of(String pathname, String ... parts)
Recall that the path can be specified in two ways. It can be passed in pieces, with the first part passed in pathname and the subsequent elements specified by the parts varargs parameter. Alternatively, the entire path can be specified in pathname and parts is not used. This is the approach used by the examples.
Use NIO for Channel-Based I/O
An important use of NIO is to access a file via a channel and buffers. The following sections demonstrate some techniques that use a channel to read from and write to a file.
Reading a File via a Channel
There are several ways to read data from a file using a channel. Perhaps the most common way is to manually allocate a buffer and then perform an explicit read operation that loads that buffer with data from the file. It is with this approach that we begin.
Before you can read from a file, you must open it. To do this, first create a Path that describes the file. Then use this Path to open the file. There are various ways to open the file depending on how it will be used. In this example,the file will be opened for byte-based input via explicit input operations. Therefore, this example will open the file and establish a channel to it by calling Files.newByteChannel(). The version of newByteChannel() that we will use has this general form:
static SeekableByteChannel newByteChannel(Path path, OpenOption ... how)
throws IOException
It returns a SeekableByteChannel object, which encapsulates the channel for file operations. The Path that describes the file is passed in path. The how parameter specifies how the file will be opened. Because it is a varargs parameter, you can specify zero or more comma-separated arguments. (The valid values were discussed earlier and shown in Table 22-5.) If no arguments are specified, the file is opened for input operations. SeekableByteChannel is an interface that describes a channel that can be used for file operations. It is implemented by the FileChannel class. When the default file system is used, the returned object can be cast to FileChannel. You must close the channel after you have finished with it. Since all channels, including FileChannel, implement AutoCloseable, you can use a try-with-resources statement to close the file automatically instead of calling close() explicitly. This approach is used in the examples.
Next, you must obtain a buffer that will be used by the channel either by wrapping an existing array or by allocating the buffer dynamically. The examples use allocation, but the choice is yours. Because file channels operate on byte buffers, we will use the allocate() method defined by ByteBuffer to obtain the buffer. It has this general form:
static ByteBuffer allocate(int cap)
Here, cap specifies the capacity of the buffer. A reference to the buffer is returned.
After you have created the buffer, call read() on the channel, passing a reference to the buffer. The version of read() that we will use is shown next:
int read(ByteBuffer buf) throws IOException
Each time it is called, read() fills the buffer specified by buf with data from the file. The reads are sequential, meaning that each call to read() reads the next buffer’s worth of bytes from the file. The read() method returns the number of bytes actually read. It returns –1 when there is an attempt to read at the end of the file.
The following program puts the preceding discussion into action by reading a file called test.txt through a channel using explicit input operations:
// Use Channel I/O to read a file.
import java.io.*;
import java.nio.*;
import java.nio.channels.*;
import java.nio.file.*;

public class ExplicitChannelRead
{
    public static void main(String args[])
    {
        int count;
        Path filepath = null;

        // First, obtain a path to the file.
        try
        {
            filepath = Path.of("test.txt");
        }
        catch (InvalidPathException e)
        {
            System.out.println("Path Error " + e);
            return;
        }

        // Next, obtain a channel to that file within a try-with-resources block.
        try (SeekableByteChannel fChan = Files.newByteChannel (filepath))
        {
            // Allocate a buffer.
            ByteBuffer mBuf = ByteBuffer.allocate (128);
            do
            {
                // Read a buffer.
                count = fChan.read (mBuf);

                // Stop when end of file is reached.
                if (count = -1)
                {
                    // Rewind the buffer so that it can be read.
                    mBuf.rewind();

                    // Read bytes from the buffer and show
                    // them on the screen as characters.
                    for (int i=0; i < count; i++)
                        System.out.print ((char) mBuf.get());
                }
            } while (count != -1);
            System.out.println();
        }
        catch (IOException e)
        {
            System.out.println("1/0 Error " + 0);
        }
    }
}
Here is how the program works. First, a Path object is obtained that contains the relative path to a file called test.txt. A reference to this object is assigned to filepath. Next, a channel connected to the file is obtained by calling newByteChannel(), passing in filepath. Because no open option is specified, the file is opened for reading. Notice that this channel is the object managed by the try-with-resources statement. Thus, the channel is automatically closed when the block ends. The program then calls the allocate() method of ByteBuffer to allocate a buffer that will hold the contents of the file when it is read. A reference to this buffer is stored in mBuf. The contents of the file are then read, one buffer at a time, into mBuf through a call to read(). The number of bytes read is stored in count. Next, the buffer is rewound through a call to rewind(). This call is necessary because the current position is at the end of the buffer after the call to read(). It must be reset to the start of the buffer in order for the bytes in mBuf to be read by calling get(). (Recall that get() is defined by ByteBuffer.) Because mBuf is a byte buffer, the values returned by get() are bytes. They are cast to char so the file can be displayed as text. (Alternatively, it is possible to create a buffer that encodes the bytes into characters and then read that buffer.) When the end of the file has been reached, the value returned by read() will be –1. When this occurs, the program ends, and the channel is automatically closed.
As a point of interest, notice that the program obtains the Path within one try block and then uses another try block to obtain and manage a channel linked to that path. Although there is nothing wrong, per se, with this approach, in many cases, it can be streamlined so that only one try block is needed. In this approach, the calls to Path.of() and newByteChannel() are sequenced together. For example, here is a reworked version of the program that uses this approach:
import java.io.*;
import java.nio.*;
import java.nio.channels.*;
import java.nio.file.*;

public class ExplicitChannelRead
{
    public static void main(String args[])
    {
        int count;
        // Here, the channel is opened on the Path returned by Path.of().
        // There is no need for the filepath variable.
        try(SeekableByteChannel fChan =
            Files.newByteChannel (Path. of ("test.txt")) )
        {
            // Allocate a buffer.
            ByteBuffer mBuf = ByteBuffer.allocate(128);
            do
            {
                // Read a buffer.
                count = fChan.read (mBuf);

                // Stop when end of file is reached.
                if (count != -1)
                {

                    // Rewind the buffer so that it can be read.
                    mBuf.rewind();

                    // Read bytes from the buffer and show
                    // them on the screen as characters.
                    for (int i=0; i < count; i++)
                        System.out.print((char) mBuf.get());
                }
            } while (count != -1);
            System.out.println();
        }
        catch (InvalidPathException e)
        {
            System.out.println("Path Error " + e);
        }
        catch (IOException e)
        {
            System.out.println("I/O Error " + e);
        }
    }
}
In this version, the variable filepath is not needed and both exceptions are handled by the same try statement. Because this approach is more compact, it is the approach used in the rest of the examples in this chapter. Of course, in your own code, you may encounter situations in which the creation of a Path object needs to be separate from the acquisition of a channel. In these cases, the previous approach can be used.
Another way to read a file is to map it to a buffer. The advantage is that the buffer automatically contains the contents of the file. No explicit read operation is necessary. To map and read the contents of a file, follow this general procedure. First, obtain a Path object that encapsulates the file as previously described. Next, obtain a channel to that file by calling Files.newByteChannel(), passing in the Path and casting the returned object to FileChannel. As explained, newByteChannel() returns a SeekableByteChannel. When using the default file system, this object can be cast to FileChannel. Then, map the channel to a buffer by calling map() on the channel. The map() method is defined by FileChannel. This is why the cast to FileChannel is needed. The map() function is shown here:
MappedByteBuffer map(FileChannel.MapMode how,
long pos, long size) throws IOException
The map() method causes the data in the file to be mapped into a buffer in memory. The value in how determines what type of operations are allowed. It must be one of these values:

// Use a mapped file to read a file.
import java.io.*;
import java.nio.*;
import java.nio.channels.*;
import java.nio.file.*;
public class MappedChannelRead
{
    public static void main(String args[])
    {
        // Obtain a channel to a file within a try-with-resources block.
        try (FileChannel fChan =
        (FileChannel) Files.newByteChannel (Path.of ("test.txt")) )
        {
            // Get the size of the file.
            long fSize = fChan.size();

            // Now, map the file into a buffer.
            MappedByteBuffer mBuf = fChan.map(FileChannel.MapMode.READ_ONLY, 0, fSize);

            // Read and display bytes from buffer.
            for (int i=0; i < fSize; i++)
                System.out.print ((char) mBuf.get());
            System.out.println();
        }
        catch (InvalidPathException e)
        {
            System.out.println("Path Error " + e);
        }
        catch (IOException e)
        {
            System.out.println("I/O Error "+ e);
        }
    }
}
In the program, a Path to the file is created and then opened via newByteChannel(). The channel is cast to FileChannel and stored in fChan. Next, the size of the file is obtained by calling size() on the channel. Then, the entire file is mapped into memory by calling map() on fChan and a reference to the buffer is stored in mBuf. Notice that mBuf is declared as a reference to a MappedByteBuffer. The bytes in mBuf are read by calling get().
Writing to a File via a Channel
As is the case when reading from a file, there are also several ways to write data to a file using a channel. We will begin with one of the most common. In this approach, you manually allocate a buffer, write data to that buffer, and then perform an explicit write operation to write that data to a file.
Before you can write to a file, you must open it. To do this, first obtain a Path that describes the file and then use this Path to open the file. In this example, the file will be opened for byte-based output via explicit output operations. Therefore, this example will open the file and establish a channel to it by calling Files.newByteChannel(). As shown in the previous section, the newByteChannel() method that we will use has this general form:
static SeekableByteChannel newByteChannel(Path path, OpenOption ... how)
throws IOException
It returns a SeekableByteChannel object, which encapsulates the channel for file operations. To open a file for output, the how parameter must specify StandardOpenOption.WRITE. If you want to create the file if it does not already exist, then you must also specify StandardOpenOption.CREATE. (Other options, which are shown in Table 22-5, are also available.) As explained in the previous section, SeekableByteChannel is an interface that describes a channel that can be used for file operations. It is implemented by the FileChannel class. When the default file system is used, the return object can be cast to FileChannel. You must close the channel after you have finished with it.
Here is one way to write to a file through a channel using explicit calls to write(). First, obtain a Path to the file and then open it with a call to newByteChannel(), casting the result to FileChannel. Next, allocate a byte buffer and write data to that buffer. Before the data is written to the file, call rewind() on the buffer to set its current position to zero. (Each output operation on the buffer increases the current position. Thus, it must be reset prior to writing to the file.) Then, call write() on the channel, passing in the buffer. The following program demonstrates this procedure. It writes the alphabet to a file called test.txt.
// Write to a file using NIO.
import java.io.*;
import java.nio.*;
import java.nio.channels.*;
import java.nio.file.*;
public class ExplicitChannelWrite
{
    public static void main(String args[])
    {
        // Obtain a channel to a file within a try-with-resources block.
        try (FileChannel fChan = (FileChannel)Files.newByteChannel (Path.of("test.txt"),StandardOpenOption.WRITE, StandardOpenOption.CREATE) )
        {
            // Create a buffer.
            ByteBuffer mBuf= ByteBuffer.allocate (26);

            // Write some bytes to the buffer.
            for (int i=0; i<26; i++)
                mBuf.put((byte) ('A' + i));

            // Reset the buffer so that it can be written.
            mBuf.rewind();

            // Write the buffer to the output file. f
            Chan.write(mBuf);
        }
        catch (InvalidPathException e)
        {
            System.out.println("Path Error " + e);
        }
        catch (IOException e)
        {
            System.out.println("I/O Error: " + e); System.exit(1);
        }
    }
}
It is useful to emphasize an important aspect of this program. As mentioned, after data is written to mBuf, but before it is written to the file, a call to rewind() on mBuf is made. This is necessary in order to reset the current position to zero after data has been written to mBuf. Remember, each call to put() on mBuf advances the current position. Therefore, it is necessary for the current position to be reset to the start of the buffer before calling write(). If this is not done, write() will think that there is no data in the buffer.
Another way to handle the resetting of the buffer between input and output operations is to call flip() instead of rewind(). The flip() method sets the value of the current position to zero and the limit to the previous current position. In the preceding example, because the capacity of the buffer equals its limit, flip() could have been used instead of rewind(). However, the two methods are not interchangeable in all cases.
In general, you must reset the buffer between read and write operations. For example, assuming the preceding example, the following loop will write the alphabet to the file three times. Pay special attention to the calls to rewind().
for (int h=0; h<3; h++)
{
    // Write some bytes to the buffer.
    for (int i=0; i<26; i++)
        mBuf.put((byte) ('A' + i));

    // Rewind the buffer so that it can be written.
    mBuf.rewind();

    // Write the buffer to the output file.
    fChan.write (mBuf);

    // Rewind the buffer so that it can be written to again.
    mBuf.rewind ();
}
Notice that rewind() is called between each read and write operation. One other thing about the program warrants mentioning: When the buffer is written to the file, the first 26 bytes in the file will contain the output. If the file test.txt was preexisting, then after the program executes, the first 26 bytes of test.txt will contain the alphabet, but the remainder of the file will remain unchanged.
Another way to write to a file is to map it to a buffer. The advantage to this approach is that the data written to the buffer will automatically be written to the file. No explicit write operation is necessary. To map and write the contents of a file, we will use this general procedure. First, obtain a Path object that encapsulates the file and then create a channel to that file by calling Files.newByteChannel(), passing in the Path. Cast the reference returned by newByteChannel() to FileChannel. Next, map the channel to a buffer by calling map() on the channel. The map() method was described in detail in the previous section. It is summarized here for your convenience. Here is its general form:
MappedByteBuffer map(FileChannel.MapMode how,
long pos, long size) throws IOException
The map() method causes the data in the file to be mapped into a buffer in memory. The value in how determines what type of operations are allowed. For writing to a file, how must be MapMode.READ_WRITE. The location within the file to begin mapping is specified by pos, and the number of bytes to map are specified by size. A reference to this buffer is returned. Once the file has been mapped to a buffer, you can write data to that buffer, and it will automatically be written to the file. Therefore, no explicit write operations to the channel are necessary.
Here is the preceding program reworked so that a mapped file is used. Notice that in the call to newByteChannel(), the open option StandardOpenOption.READ has been added. This is because a mapped buffer can either be read-only or read/write. Thus, to write to the mapped buffer, the channel must be opened as read/write.
// Write to a mapped file.
import java.io.*;
import java.nio.*;
import java.nio.channels.*;
import java.nio.file.*;
public class MappedChannelWrite
{
    public static void main(String args[])
    {
        // Obtain a channel to a file within a try-with-resources block.
        try (FileChannel fChan = (FileChannel) Files.newByteChannel (Path. of ("test.txt"),StandardOpenOption.WRITE, StandardOpenOption. READ,StandardOpenOption.CREATE))
        {
            // Then, map the file into a buffer.
            MappedByteBuffer mBuf = fChan.map (FileChannel. MapMode.READ_WRITE, 0, 26);

            // Write some bytes to the buffer.
            for (int i=0; i<26; i++)
                mBuf.put((byte) ('A' + i));
        }
        catch (InvalidPathException e)
        {
            System.out.println("Path Error " + e);
        }
        catch (IOException e)
        {
            System.out.println("1/0 Error " + e) ;
        }
    }
}
As you can see, there are no explicit write operations to the channel itself. Because mBuf is mapped to the file, changes to mBuf are automatically reflected in the underlying file.
Copying a File Using NIO
NIO simplifies several types of file operations. Although we can’t examine them all, an example will give you an idea of what is available. The following program copies a file using a call to a single NIO method: copy(), which is a static method defined by Files. It has several forms. Here is the one we will be using:
static Path copy(Path src, Path dest, CopyOption ... how) throws IOException
The file specified by src is copied to the file specified by dest. How the copy is performed is specified by how. Because it is a varargs parameter, it can be missing. If specified, it can be one or more of these values, which are valid for all file systems:

The following program demonstrates copy(). The source and destination files are specified on the command line, with the source file specified first. Notice how short the program is. You might want to compare this version of the file copy program to the one found in Chapter 13. As you will find, the part of the program that actually copies the file is substantially shorter in the NIO version shown here.
// Copy a file using NIO.
import java.io.*;
import java.nio.*;
import java.nio.channels.*;
import java.nio.file.*;
public class NIOCopy
{
    public static void main(String args[])
    {
        if (args.length != 2)
        {
            System.out.println("Usage: Copy from to");
            return;
        }
        try
        {
            Path source = Path. of (args[0]);
            Path target = Path. of (args[1]);

            // Copy the file.
            Files.copy(source, target, StandardCopyOption. REPLACE_EXISTING);
        }
        catch (InvalidPathException e)
        {
            System.out.println("Path Error " + e);
        }
        catch (IOException e)
        {
            System.out.println("I/O Error " + e);
        }
    }
}
Use NIO for Stream-Based I/O
Beginning with NIO.2, you can use NIO to open an I/O stream. Once you have a Path, open a file by calling newInputStream() or newOutputStream(), which are static methods defined by Files. These methods return a stream connected to the specified file. In either case, the stream can then be operated on in the way described in Chapter 20, and the same techniques apply. The advantage of using Path to open a file is that all of the features defined by NIO are available for your use.
To open a file for stream-based input, use Files.newInputStream(). It is shown here:
static InputStream newInputStream(Path path, OpenOption ... how) throws IOException
Here, path specifies the file to open and how specifies how the file will be opened. It must be one or more of the values defined by StandardOpenOption, described earlier. (Of course, only those options that relate to an input stream will apply.) If no options are specified, then the file is opened as if StandardOpenOption.READ were passed.
Once opened, you can use any of the methods defined by InputStream. For example, you can use read() to read bytes from the file.
The following program demonstrates the use of NIO-based stream I/O. It reworks the ShowFile program from Chapter 13 so that it uses NIO features to open the file and obtain a stream. As you can see, it is very similar to the original, except for the use of Path and newInputStream().
/* Display a text file using stream-based, NIO code. To use this program, specify the name of the file that you want to see. For example, to see a file called TEST.TXT, use the following command line.java ShowFile TEST.TXT
*/
import java.io.*;
import java.nio.file.*;
class ShowFile
{
    public static void main(String args[])
    {
        int i;
        // First, confirm that a filename has been specified.
        if (args.length != 1)
        {
            System.out.println("Usage: ShowFile filename");
            return;
        }

        // Open the file and obtain a stream linked to it.
        try (InputStream fin = Files.newInputStream (Path. of (args[0])) )
        {
            do
            {
                i = fin.read();
                if (i!= -1)
                    System.out.print((char) i);
            } while (i!= -1);
        }
        catch (InvalidPathException e)
        {
            System.out.println("Path Error " + e);
        }
        catch (IOException e)
        {
            System.out.println("I/O Error " + e);
        }
    }
}
Because the stream returned by newInputStream() is a normal stream, it can be used like any other stream. For example, you can wrap the stream inside a buffered stream, such as a BufferedInputStream, to provide buffering, as shown here:
new BufferedInputStream(Files.newInputStream(Path.of(args[0])))
Now, all reads will be automatically buffered. To open a file for output, use Files.newOutputStream(). It is shown here:
static OutputStream newOutputStream(Path path, OpenOption ... how)
throws IOException
Here, path specifies the file to open and how specifies how the file will be opened. It must be one or more of the values defined by StandardOpenOption, described earlier. (Of course, only those options that relate to an output stream will apply.) If no options are specified, then the file is opened as if StandardOpenOption.WRITE, StandardOpenOption.CREATE, and StandardOpenOption.TRUNCATE_EXISTING were passed.
The methodology for using newOutputStream() is similar to that shown previously for newInputStream(). Once opened, you can use any of the methods defined by OutputStream. For example, you can use write() to write bytes to the file. You can also wrap the stream inside a BufferedOutputStream to buffer the stream.
The following program shows newOutputStream() in action. It writes the alphabet to a file called test.txt. Notice the use of buffered I/O.
// Demonstrate NIO-based, stream output.
import java.io.*;
import java.nio.file.*;
class NIOStreamWrite
{
    public static void main(String args[])
    {
        // Open the file and obtain a stream linked to it.
        try (OutputStream fout =new BufferedOutputStream(
            Files.newOutputStream (Path. of ("test.txt"))) )
        {
            // Write some bytes to the stream.
            for (int i=0; i < 26; i++)
                fout.write((byte) ('A' + i));
        }
        catch (InvalidPathException e)
        {
            System.out.println("Path Error " + e);
        }
        catch (IOException e)
        {
            System.out.println("I/O Error: "+ e);
        }
    }
}
Use NIO for Path and File System Operations
At the beginning of Chapter 21, the File class in the java.io package was examined. As explained there, the File class deals with the file system and with the various attributes associated with a file, such as whether a file is read-only, hidden, and so on. It was also used to obtain information about a file’s path. Although the File class is still perfectly acceptable, the interfaces and classes defined by NIO.2 offer a better way to perform these functions. The benefits include support for symbolic links, better support for directory tree traversal, and improved handling of metadata, among others. The following sections show samples of two common file system operations: obtaining information about a path and file and getting the contents of a directory.
REMEMBER
If you want to change code that uses java.io.File to the Path interface, you can use the toPath() method to obtain a Path instance from a File instance.
Obtain Information About a Path and a File
Information about a path can be obtained by using methods defined by Path. Some attributes associated with the file described by a Path (such as whether or not the file is hidden) are obtained by using methods defined by Files. The Path methods used here are getName(), getParent(), and toAbsolutePath(). Those provided by Files are isExecutable(), isHidden(), isReadable(), isWritable(), and exists(). These are summarized in Tables 22-3 and 22-4, shown earlier.
CAUTION
Methods such as isExecutable(), isReadable(), isWritable(), and exists() must be used with care because the state of the file system may change after the call, in which case a program malfunction could occur. Such a situation could have security implications.
Other file attributes are obtained by requesting a list of attributes by calling Files.readAttributes(). In the program, this method is called to obtain the BasicFileAttributes associated with a file, but the general approach applies to other types of attributes.
The following program demonstrates several of the Path and Files methods, along with several methods provided by BasicFileAttributes. This program assumes that a file called test.txt exists in a directory called examples, which must be a subdirectory of the current directory.
import java.io.*;
import java.nio.file.*;
import java.nio.file.attribute.*;
class PathDemo
{
    public static void main(String args[])
    {
        Path filepath = Path.of ("examples\\test.txt");

        System.out.println("File Name:" +filepath.getName(1));
        System.out.println("Path: " + filepath);
        System.out.println("Absolute Path: "+filepath.toAbsolutePath());
        System.out.println("Parent: "+filepath.getParent());

        if (Files.exists(filepath))
            System.out.println("File exists");
        else
            System.out.println("File does not exist");

        try
        {
            if (Files.isHidden(filepath))
                System.out.println("File is hidden");
            else
                System.out.println("File is not hidden");
        }
        catch (IOException e)
        {
            System.out.println("1/0 Error: " + e);
        }

            Files.isWritable(filepath);
            System.out.println("File is writable");

            Files.isReadable (filepath);
            System.out.println("File is readable");

        try
        {
            BasicFileAttributes attribs = Files.readAttributes (filepath, BasicFileAttributes.class);

            if (attribs.isDirectory())
                System.out.println("The file is a directory");
            else
                System.out.println("The file is not a directory");

            if (attribs.isRegularFile())
                System.out.println("The file is a normal file");
            else
                System.out.println("The file is not a normal file");

            if (attribs.isSymbolicLink())
                System.out.println("The file is a symbolic link");
            else
                System.out.println("The file is not a symbolic link");
            System.out.println("File last modified: "+attribs.lastModifiedTime());
            System.out.println("File size: " + attribs.size()+" Bytes");
        }
        catch (IOException e)
        {
            System.out.println("Error reading attributes: " + e);
        }
    }
}
If you execute this program from a directory called MyDir, which has a subdirectory called examples, and the examples directory contains the test.txt file, then you will see output similar to that shown here. (Of course, the information you see will differ.)
File Name: test.txt

Path: examples\\test.txt

Absolute Path: C:\\MyDir\\examples\\test.txt

Parent: examples

File exists

File is not hidden

File is writable

File is readable

The file is not a directory

The file is a normal file

The file is not a symbolic link

File last modified: 2017-01-01T18:20:46.380445Z

File size: 18 Bytes
If you are using a computer that supports the FAT file system (i.e., the DOS file system), then you might want to try using the methods defined by DosFileAttributes. If you are using a POSIX-compatible system, then try using PosixFileAttributes.
List the Contents of a Directory
If a path describes a directory, then you can read the contents of that directory by using static methods defined by Files. To do this, you first obtain a directory stream by calling newDirectoryStream(), passing in a Path that describes the directory. One form of newDirectoryStream() is shown here:
static DirectoryStream<Path> newDirectoryStream(Path dirPath) throws IOException
Here, dirPath encapsulates the path to the directory. The method returns a DirectoryStream
DirectoryStream
The following program displays the contents of a directory called MyDir:
// Display a directory.
import java.io.*;
import java.nio.file.*;
import java.nio.file.attribute.*;
class DirList
{
    public static void main(String args[])
    {
        String dirname = "\\MyDir";

        // Obtain and manage a directory stream within a try block.
        try(DirectoryStream<Path> dirstrm =Files.newDirectoryStream(Path. of (dirname)) )
        {
            System.out.println("Directory of " + dirname);

            // Because DirectoryStream implements Iterable, we
            // can use a "foreach" loop to display the directory.
            for (Path entry: dirstrm)
            {
                BasicFileAttributes attribs = Files.readAttributes (entry, BasicFileAttributes.class);
                if (attribs.isDirectory())
                    System.out.print ("<DIR> ");
                else
                System.out.print (" ");

            System.out.println(entry.getName(1));
            }
        }
        catch (InvalidPathException e)
        {
            System.out.println("Path Error " + e);
        }
        catch (NotDirectoryException e)
        {
            System.out.println (dirname + " is not a directory.");
        }
        catch (IOException e)
        {
            System.out.println("I/O Error: " + e);
        }
    }
}
Here is sample output from the program:
Directory of \MyDir
        DirList.class
        DirList.java
<DIR> example
        Test.txt
You can filter the contents of a directory in two ways. The easiest is to use this version of newDirectoryStream():
static DirectoryStream<Path> newDirectoryStream(Path dirPath, String wildcard)
throws IOException
In this version, only files that match the wildcard filename specified by wildcard will be obtained. For wildcard, you can specify either a complete filename or a glob. A glob is a string that defines a general pattern that will match one or more files using the familiar ***** and ? wildcard characters. These match zero or more of any character and any one character, respectively. The following are also recognized within a glob:

Files.newDirectoryStream(Path.of(dirname), "{Path,Dir}*. {java,class}")
This obtains a directory stream that contains only those files whose names begin with either “Path” or “Dir” and use either the “java” or “class” extension. Thus, it would match names like DirList.java and PathDemo.java, but not MyPathDemo.java, for example.
Another way to filter a directory is to use this version of newDirectoryStream():
static DirectoryStream<Path> newDirectoryStream(Path dirPath, DirectoryStream.Filter<? super Path> filefilter)throws IOException
Here, DirectoryStream.Filter is an interface that specifies the following method:
boolean accept(T entry) throws IOException
In this case, T will be Path. If you want to include entry in the list, return true. Otherwise, return false. This form of newDirectoryStream() offers the advantage of being able to filter a directory based on something other than a filename. For example, you can filter based on size, creation date, modification date, or attribute, to name a few.
The following program demonstrates the process. It will list only those files that are writable.
// Display a directory of only those files that are writable.
import java.io.*;
import java.nio.file.*;
import java.nio.file.attribute.*;

class DirList
{
    public static void main(String args[])
    {
        String dirname = "\\MyDir";

        // Create a filter that returns true only for writable files.
        DirectoryStream.Filter<Path> how = new DirectoryStream.Filter<Path>()
        {
            public boolean accept (Path filename) throws IOException
            {
                if (Files.isWritable(filename))
                    return true;
                return false;
            }
        };

        // Obtain and manage a directory stream of writable files.
        try (DirectoryStream<Path> dirstrm = Files.newDirectoryStream (Path. of (dirname), how) )
        {
            System.out.println("Directory of " + dirname);

            for (Path entry : dirstrm)
            {
                BasicFileAttributes attribs = Files.readAttributes (entry, BasicFileAttributes.class);
                if (attribs.isDirectory())
                    System.out.print ("<DIR>");
                else
                    System.out.print (" ");
                System.out.println(entry.getName(1));
            }
        }
        catch (InvalidPathException e)
        {
            System.out.println("Path Error" + e);
        }
        catch (NotDirectoryException e)
        {
            System.out.println(dirname + " is not a directory.");
        }
        catch (IOException e)
        {
            System.out.println("1/0 Error: " + e);
        }
    }
}
Use walkFileTree() to List a Directory Tree
The preceding examples have obtained the contents of only a single directory. However, sometimes you will want to obtain a list of the files in a directory tree. In the past, this was quite a chore, but NIO.2 makes it easy because now you can use the walkFileTree() method defined by Files to process a directory tree. It has two forms. The one used in this chapter is shown here:
static Path walkFileTree(Path root, FileVisitor<? super Path> fv) throws IOException
The path to the starting point of the directory walk is passed in root. An instance of FileVisitor is passed in fv. The implementation of FileVisitor determines how the directory tree is traversed, and it gives you access to the directory information. If an I/O error occurs, an IOException is thrown. A SecurityException is also possible.
FileVisitoris an interface that defines how files are visited when a directory tree is traversed. It is a generic interface that is declared like this:
interface FileVisitor<T>
For use in walkFileTree(), T will be Path (or any type derived from Path). FileVisitor defines the following methods:
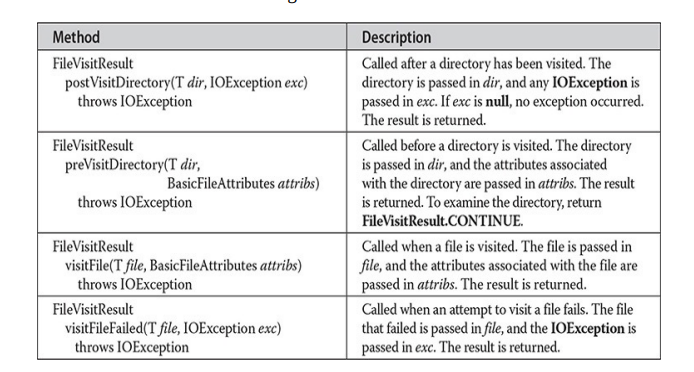

Although it is certainly possible to create your own visitor class that implements these methods defined by FileVisitor, you won’t normally do so because a simple implementation is provided by SimpleFileVisitor. You can just override the default implementation of the method or methods in which you are interested. Here is a short example that illustrates the process. It displays all files in the directory tree that has \MyDir as its root. Notice how short this program is.
// A simple example that uses walkFileTree() to display a directory tree.
import java.io.*;
import java.nio.file.*;
import java.nio.file.attribute.*;

// Create a custom version of SimpleFileVisitor that overrides
// the visitFile() method.
class MyFileVisitor extends SimpleFileVisitor<Path>
{
    public FileVisitResult visitFile (Path path, BasicFileAttributes attribs) throws IOException
    {
        System.out.println(path);
        return FileVisitResult.CONTINUE;
    }
}
class DirTreeList
{
    public static void main(String args[])
    {
        String dirname = "\\MyDir";

        System.out.println("Directory tree starting with " + dirname + ":\n");
        try
        {
            Files.walkFileTree (Path.of (dirname), new MyFileVisitor());
        }
        catch (IOException exc)
        {
            System.out.println("1/0 Error");
        }
    }
}
Here is sample output produced by the program when used on the same MyDir directory shown earlier. In this example, the subdirectory called examples contains one file called MyProgram.java.
Directory tree starting with \\MyDir:

\\MyDir\\DirList.class

\\MyDir\\DirList.java

\\MyDir\\examples\\MyProgram.java

\\MyDir\\Test.txt
In the program, the class MyFileVisitor extends SimpleFileVisitor, overriding only the visitFile() method. In this example, visitFile() simply displays the files, but more sophisticated functionality is easy to achieve. For example, you could filter the files or perform actions on the files, such as copying them to a backup device. For the sake of clarity, a named class was used to override visitFile(), but you could also use an anonymous inner class.
One last point: It is possible to watch a directory for changes by using java.nio.file.WatchService.